Have RV and Camera, Will Travel
David Maynard traveled the country for his fall photo workshops with his Tamron SP 24-70mm VC and SP 70-200mm VC lenses.
By Jenn Gidman
Images by David Guy Maynard
For three weeks this autumn, David Guy Maynard packed up a camper and traveled up and around the East Coast and Midwest for his fall tour workshops. "We started in Florida, made stops in the Carolinas and New Jersey, then headed over to Michigan, the Dakotas, and Nebraska," he says. "What was especially awesome was that I had the freedom to capture extra photos along the way, which offered an amazing look at all of these different parts of the US. It could be grueling—sometimes we'd drive between five and seven hours, drop the camper off, hold a four-hour workshop, and then sleep before getting up to do it all over again—but it was all worth it."
David describes six of the images he captured on his cross-country adventure with his Tamron SP 24-70mm VC and 70-200mm VC lenses, including a once-in-a-lifetime chance to capture the spectacular northern lights, and offers tips on taking similar photos. (Don't forget to take advantage of the mail-in rebates on these two lenses through 12/31/16: $200 for the 24-70, and $300 for the 70-200.)
Establish rapport with your subjects when taking portraits.
I photographed a model at my New Jersey workshop, and though she hadn't been modeling for that long, she did great. However, whether you're working with an experienced model or one right out of the gate, the same rule applies: Quickly establish a comfortable rapport. If the chemistry is there, you'll get a much more natural look. She had a crowd of about 30 people standing around watching me shoot, so it was even more important that she and I connected, and that she was comfortable.
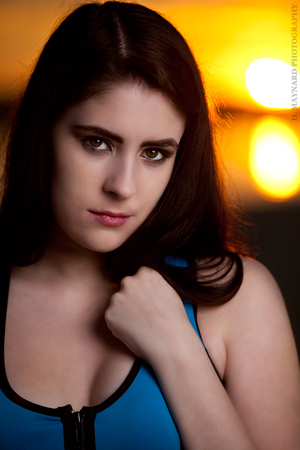
The light for this first portrait was very basic: a single battery-powered monolight that gave me terrific skin tones. A lot of times, people will simply put a shoe-mount flash on their camera and even diffuse it, which can be a cool way of lighting. However, when you're doing a sunset shoot like this, if the flash is on your camera, you'll get very direct, flat lighting.
You'll also notice the very harsh sunset behind her—it was glaring, and so I had to really pound her with light at a pretty significant speed to get the results I wanted. I took this with my 70-200mm lens at 177mm at F/2.8, ISO 100, using my camera's high-speed sync feature. Normally I'd only be able to shoot at 1/250th of a second or so when using a flash, but with HSS, I was able to shoot at 1/1000th of a second, which brought the ambient light down and gave me a more subdued, sculpted light.
Plus, the 70-200 is wonderful for lens compression. Anything over 130mm, and you'll start to get this incredible bokeh. It compresses the background so well at an open aperture. If you look at that sunset, you've got the sun, the horizon, and the water behind her reflecting that sun, but you almost can't make out that's what it is because the depth-of-field is so shallow directly behind her.
Find your focal sweet spot.
The water behind the model you see here is Lake Superior. We spent three days up there, and it's literally in the middle of nowhere—you can't even get a cellphone signal. The model was Sammi, my second camera and photographic apprentice, often doubling on this trip as my model. You'll notice her eyes were a little glossy here, because it was freezing. Between shots we were throwing a parka on her.
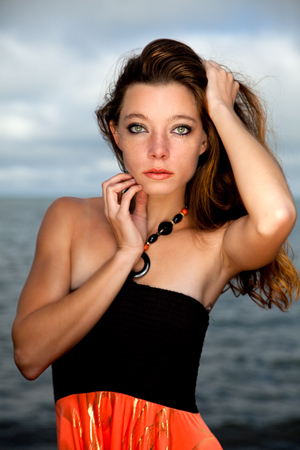
You can see in the distance there's some blue in the sky, but over the top of us, there were mottled clouds, so the natural light falling on my subject was horrible; the brightest spot was behind her. I used the same basic lighting scenario as with the previous model: a single battery-powered moonlight off-camera (I used a reflector also). I took this photo with the 24-70 at 70mm, F/3.5, at 1/3200th of a second, ISO 100. If you look at the image carefully, you'll notice at the horizon that the clouds softly blend into the waterline. Those settings gave me a beautiful, soft background, while she mostly stays in focus. The shallow depth-of-field lends a softness to her skin while retaining a sharpness in her eyes.
Finding that sweet spot can be difficult for even experienced photographers. If you're off, even a tiny bit, one eye can be in focus and the other not. You'll notice in this shot, at 70mm at F/3.5, her left ear is still in focus, along with her eye—I had a good 1 foot to 1.5 feet in that depth-of-field. There are so many variables that can affect that, though: Had I stepped backward a bit, it would've changed; had I gone closer to her, it would have definitely changed. A slight change in aperture also would have switched things up.
Be willing to get into the thick of things for the photos you want.
The waterfalls in one of the Upper Peninsula's state parks are stunning. They're located at the bottom of a whitewater rapids river that comes out of a lake on the mountain and feeds into Lake Superior.
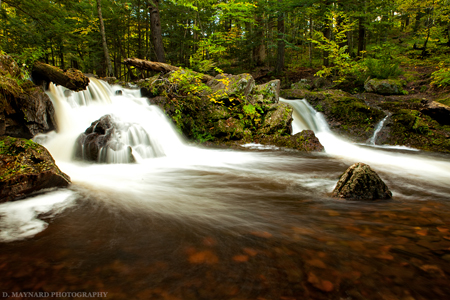
My boots got wet for this photo, as did my tripod. I was on a little shoal, leaning on a log that's jammed into the rocks. I set my tripod deep into the water and shot back up at the waterfall. Had I not been willing to get my feet wet, I still could have gotten a photo of the waterfalls, but it wouldn't have been that composition. I wanted to get not only the two distinct waterfalls, but also the tiny one off to the right side. Where my feet would have been dry was further back to my left, but as you can see, with the middle section of stone there, standing there would have blocked out 90 percent of that second waterfall.
There were a lot of trees around this one particular waterfall, which offered an incredible amount of shade. I took this photo with the 24-70mm at 27mm, at F/14, ISO 100. The water was moving quickly, so all I needed was a 3.2-second shutter speed to get that soft look. I did take some longer-exposure images at 10 to 15 seconds, but because the water was moving so fast, it didn't even look like a waterfall anymore at those speeds—it looked like someone had dumped white paint in there.
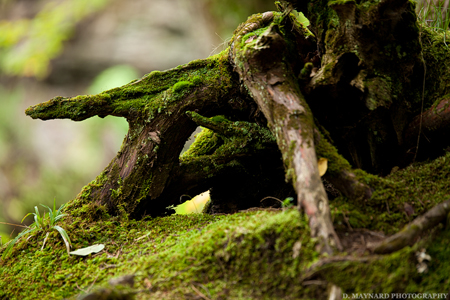
Look for nature's "artwork" where you least expect it.
It's important to seek out details for more artistic types of images. I was making my way down a hilly incline so I could position myself to capture a photo of the whitewater river when I happened to see this trunk sticking out of the bank. I thought it was gorgeous—nature's expression of abstract art. I also love taking pictures of driftwood and am a bonsai fanatic, so I think I'm just drawn to this kind of subject.
This trunk was a little further up the river, and I had to use the 70-200 lens to capture it. It was on the other side of the bank, near the rapids, and I couldn't get directly to it. I was on a rocky bank without a tripod, so I braced myself on a fallen log after I positioned myself to get the best angle. I didn't want to climb back up the bank to get a flash out of my bag, so I took this photo in all-natural light. It was dark and shadowy where I was, which is a testament to the Vibration Compensation on this lens. I took this at F/2.8 at 1/30th of a second, ISO 100. Most people wouldn't even attempt that handheld.
Had I not wanted to try that, or if I hadn't had a lens capable of that kind of stabilization, what I would have done is bumped my ISO up to around 400 so I wouldn't have to go so slow in my shutter speed. But you'll notice the depth-of-field is slightly shallow. The piece of dead wood toward me is a bit out of focus, with that nice bokeh behind it, but it's so tack-sharp, even at 1/30th of a second, that you can count the fibers in the moss.
When shooting the night sky, add elements for context.
In the Upper Peninsula, it's so dark that when you look up you can see the Milky Way with the naked eye—it's one of the most unbelievable night skies I've ever seen. In this particular case, I needed a very heavy coat and scarf because it was nighttime, so it was brutally cold.
If you're going to go with certain long exposures for night sky pictures like this, you need to use a tripod. And even then you don't want to go much over a 30-second exposure or you'll start to get star trails. Instead of the stars being pretty little dots, they'll end up being lines, which is a cool effect if that's what you're going for, but annoying if you're not.
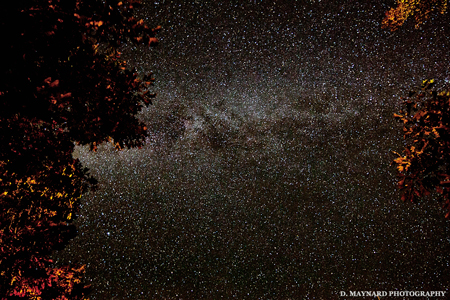
I could have just photographed the Milky Way up in the sky, but I really wanted context as to where I was, like an element in the foreground. It just so happens that to the left of me, there was a little bonfire where some people were trying to stay warm. I was far enough away where just a little flicker of light was hitting the bottom of the tree branches, bringing out the gold tones in those autumn leaves. That's what made me decide to shoot through the tree branches. I took this at 24mm, F/4, with a 33-second exposure at ISO 4000.
To focus on something like this, put your focus in manual, then set it to infinity. Some of the objects in the Milky Way are many light-years away from us, so this is the most effective setting. If you really want to focus on one particular cluster, you can lock your focus and then go to manual, but that's a challenge unless you've got a really bright star to focus on.
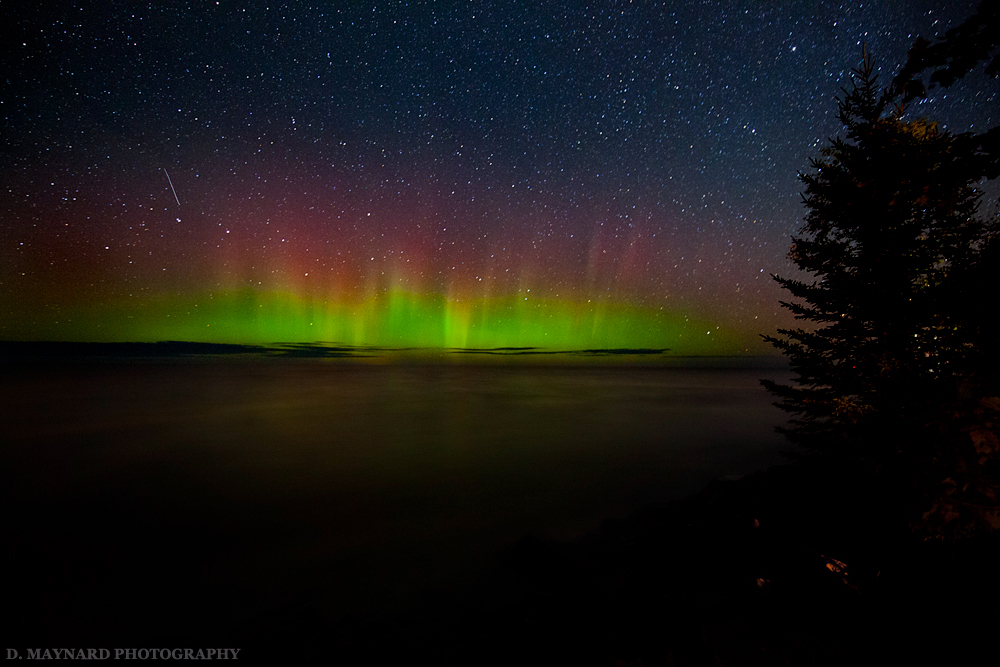
Be prepared to capture fleeting moments in nature.
I had only seen the northern lights once before in my life, but I didn't have a camera at the time. So I was especially excited to do this trip, because the auroras near Lake Superior in the autumn are a pretty famous attraction. On the first night, the borealis came in at around 1 a.m., but it was weak, and clouds were partially covering it over the lake. On the second night I was rewarded. Right around the same time, not long after midnight, it lit right up.
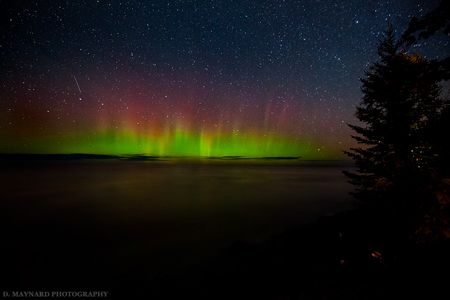
But auroras are very unpredictable. They could stick around for five minutes or two hours. In our case, this aurora stayed intense for about 15 minutes. If one decides to stay for just 15 minutes and you're doing 30-second exposures, you're not going to get many shots off, so you have to be prepared. There would be nothing worse than traveling to the opposite end of the country, staying up all night, then afterwards realizing you didn't get a crisp shot.
Once again, I wanted some context, which is why I put that tree in silhouette in the background. You're able to tell that this is what I'm seeing from a shoreline. As for why I put the tree in silhouette: I had bought a powerful little flashlight, and what I did on some of the images during the 33-second exposure I was using was make a trail of light across the rocks and the tree to add a little color. Those images came out nice, but I noticed with that composition, the eye tended to be drawn to the tree in the foreground rather than concentrating on the aurora itself. With the tree in silhouette, you still get that sense of location, but your eye is focused where it should be—on the northern lights.
There wasn't a lot of post-processing involved. The colors you see here are pretty much the way they appeared in my camera. The only thing I did was get rid of the little bit of digital noise you could see in the shadows on the water, because I was shooting at 4000 ISO. Otherwise, what you see here was exactly what we saw. We didn't even take pictures for the first few minutes we were there, because it was breathtaking. We just stood there taking it all in.