Tamron Blogs
Share the article:
More Photo Tips | Video Gallery | Photo Gallery | Enewsletter sign-up
How to: 5 Approaches Plus Tips for Photographing Birds
Tips and Images by Lisa Langell
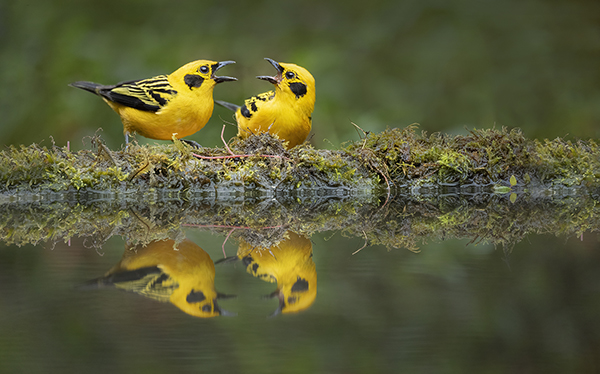
Tamron 150-500mm (500mm), F/6.7, 1/1000 sec., ISO 4000
Click image to view larger
Bird photography is quickly becoming one of the most popular genres. And with avian subjects readily available around the world, you have unlimited opportunities to practice and excel in this photographic genre. Lisa Langell, outfitted with her versatile Tamron telephoto zoom lenses, is a master of the craft and shares her top tips for creating incredible bird images.
Tip #1) Birds in Flight
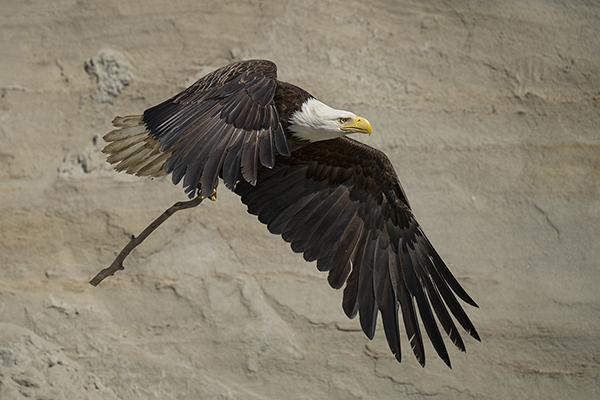
Tamron 150-500mm (347mm), F/6.3, 1/2000 sec., ISO 400
Click image to view larger
Photographing birds in flight is one of the toughest bird photography challenges. Obtaining consistently high-quality images typically requires good technique, quality gear, the right settings, and cooperative birds.
Try these tips to improve your images of birds in flight:
Shutter Speed—Choose a shutter speed appropriate for the bird in flight. Estimated shutter speeds are as follows:
• Faster birds: Ducks, terns, passerines: +/- 1/2500 to 1/3200 second
• Slower birds: Cranes, herons, eagles: +/- 1/1200 to 1/1600 second
Aperture—For most situations, apertures of f/4 to f/6.3 will work best to create subject/background separation and let in the most light, enabling the faster shutter speeds with lower ISO settings.
ISO—If you’re just getting your feet wet with manual settings, leave your ISO on “Auto” if your camera allows for it. This will enable you to prioritize the shutter speed and aperture, giving you two important design choices for the look of your image and subject, leaving the ISO to “float” into place. Just keep an eye on the ISO. Every camera varies, but as the ISO goes up, so does the noise in your images.
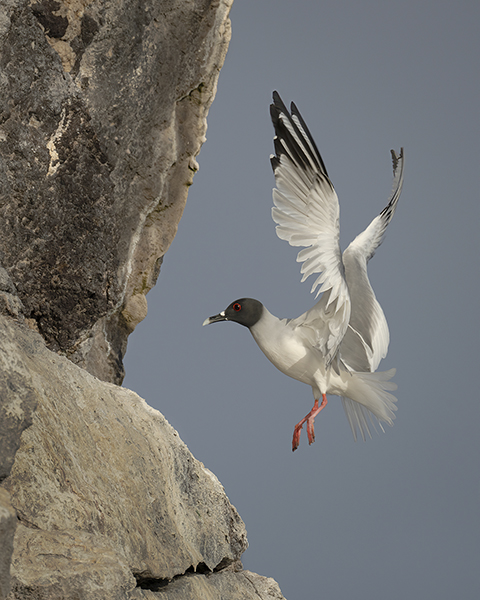
Tamron 150-500mm (500mm), F/8, 1/1600 sec., ISO 320
Click image to view larger
Focus settings—Setting will vary depending on your camera format.
• DSLR Cameras: AI Servo (Canon), Autofocus Continuous (AFC) or Continuous Auto Focus: Cameras vary on the nomenclature used, but make sure your camera is set to autofocus on a continuous basis. AF-C or AI-Servo are the most common terms. This must be ON for your camera to track the subject while half-pressing the shutter button.
• Mirrorless Cameras: The focus settings are a bit more complex here, but most will have an eye-tracking setting for animals. Ensure this is turned on. Check your manual or review online tutorials for your brand and model of camera for details on supporting settings for tracking animals.
• Focus Points: I prefer the 9-point “box” for autofocus. That said, each camera is different and may offer you different options. My least favorite is single-point (one square, or box) which makes it more difficult to keep that single little box on the subject when tracking.
Burst Mode / High Speed Shutter: This setting will allow you to maximize the frames-per-second for your camera, essential for photographing birds in flight and capturing the many wing positions provided.
Image Stabilization / Vibration Compensation (VC): Tamron’s SP 150-600mm F/5-6.3 Di VC USD G2, Tamron 50-400mm f/4.5-6.3 Di III VC VXD Lens for Sony E, and Tamron 150-500mm f/5-6.7 Di III VC VXD Lens for Sony E all offer Vibration Compensation as a benefit. This can dramatically improve sharpness in an image as it compensates for natural shake when hand-holding or swinging your camera across the sky when mounted to a gimbal head on a tripod.
VC often has three modes: 1, 2, and 3. Mode 1 is for stationary subjects where you are hand-holding your camera to capture perched birds that are fairly still. Mode 2 is for capturing subjects when panning across the sky, such as the case with birds in flight. It stabilizes for vertical jitter, but not horizontal—meaning that you are panning across as your bird flies. The camera/lens will not correct for left-right movement/shake. Mode 3 is for significant shake. This is typically needed when photographing from a boat or other unstable conditions. For birds in flight, you will typically want to set your VC to Mode 2. If you do not have a Mode 2, turn VC to “On.”
These settings are suggestions to get started. You may vary them as needed to your taste.
Freezing the action in-flight means looking for unique moments to capture. It could be a bird catching prey, flying to its nest, or fighting with other birds. Action and story-telling are often a key ingredient to successful images of birds-in-flight.
Tip #2) Birds in silhouette
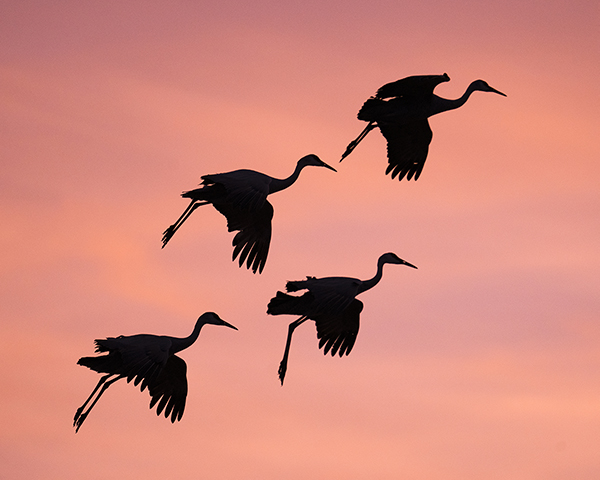
Tamron 150-500mm (500mm), F/6.7, 1/1600 sec., ISO 1600
Click image to view larger
Photographing birds in silhouette is a fantastic way to maximize the available light to create dramatic, evocative images. Done well, silhouettes capture the hearts of your audience and demonstrate your ability to “see” images that others often do not. Silhouettes require:
• Uncluttered / clear backgrounds and foregrounds.
• A subject that is free from merging into any foreground or background elements (e.g., a stick or trunk crossing in front of or behind the bird).
• Strong contrast between the nearly-black subject and the background. Typically skies or water must be vivid, much brighter than the subject, and dramatic in nature. Capturing silhouettes just before sunrise or just after sunset can create the best color and light.
• Position yourself so that you are facing the light source (i.e., the sun). Expose for the sky, not the subject (this is essential). Compose so that your subject is in, or very near, the brightest part of the sky.
• Focus on the bird, but keep your exposure set for the sky.
• Use a shutter speed that is appropriate for your subject. Your aperture can remain wide open if/as needed (e.g., f/4 to f/6.3) and take the image!
• Your histogram will approximately look like this:
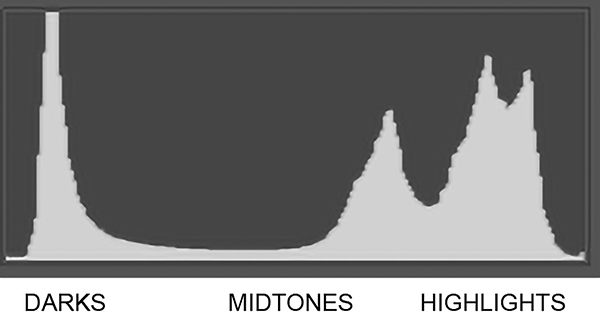
Note the strong upswing with the darker tones and then another upswing with the highlights.
Click image to view larger
Tip #3) Panning
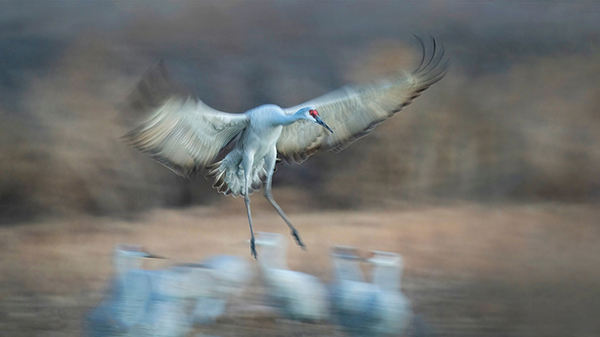
Tamron 150-500mm (500mm), F/16, 1/25th sec., ISO Auto
Click image to view larger
Panning while using a slow shutter speed is a special type of bird-in-flight photography. It emphasizes the sense of motion, creating ethereal, painterly styled images.
The images that typically look the best are those where the head of the bird is acceptably sharp, or at least recognizable, while the body and wings are blurred to various degrees. There is a lot of individuality in what photographers perceive as correct with this artistic genre.
This type of photography carries with it a “low-hit-rate.” This means you must give yourself grace and be forgiving as perhaps only 1/100 images may turn out successfully. Both the bird and photographer must cooperate for it to work.
Lighting is critical for this type of photography. Avoid sunny, bright days. The best light is typically heavily overcast daylight, abundant open shade, or blue-hour.
Suggested Settings for Panning:
• Shutter speed: For slower birds (cranes, herons, egrets) use 1/15th to 1/25th second; for faster birds (ducks, terns, geese) try 1/40th to 1/60th second
• Aperture: Close-down your aperture to the f-stop needed to allow your shutter to be open at the above settings. Typically, you may be at up to f/22 to f/45 unless you are taking images in very low-light conditions (e.g., blue hour or heavily overcast days).
• ISO: Most often, the ISO will need to be set at 100 or so. Rarely will it need to go above ISO 800 unless you are photographing in extremely low light conditions.
• Focus: AI Servo (Canon) or AF-C (Continuous Focus – Auto)
• Eye tracking: On for animals
• Image stabilization/ Vibration Compensation (VC): With the Tamron 150-500mm, 150-600mm, or 50-400mm lenses, you will want to set VC to: Mode 2, depending on your lens. Mode 2 compensates for vertical vibration but allows you to swing your camera/lens combo horizontally without stabilizing it. This prevents your camera/lens from correcting for the exact motion you are trying to create with panning. If you do not have a Mode 2, turn your VC OFF.
• High speed shutter/ Burst Mode: On
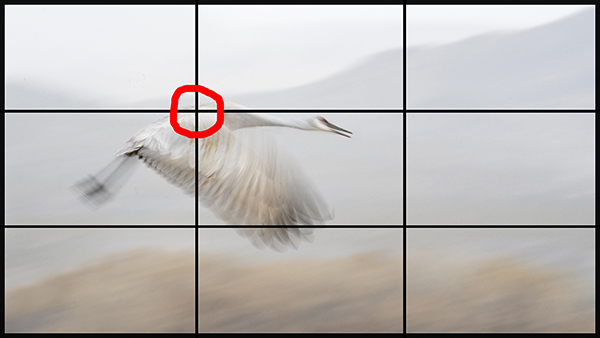
Tamron 150-500mm (500mm), F/25, 1/25 sec., ISO 1600
Click image to view larger
The key to this type of photography is to track your subject in a way that it always stays in the exact same spot in the frame the entire time you are panning across the scene, continuously focusing, and taking images at a high rate per second. If you track faster than the bird, or the bird flies faster than you track it, your bird will move to a different place in the grid. This results in a “ghosting” effect (e.g., it will appear as though the bird has two heads, two sets of wings, or other artifacts). Every single image must remain in the same location in the frame for your panning images to be successful. Careful practice and timing results in success.
Tip #4) Birds in their environment
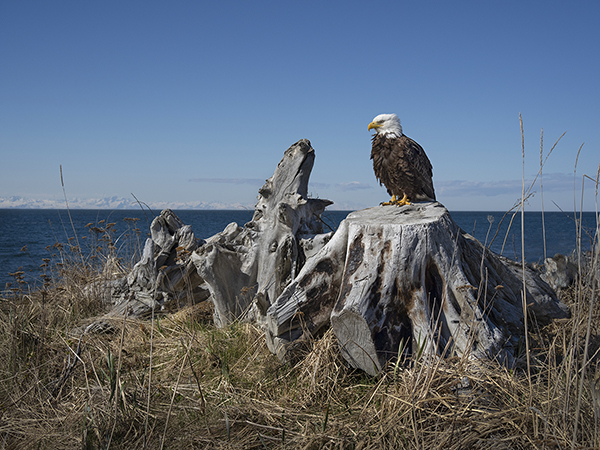
Tamron 50-400mm (50mm), F/6.7, 1/1600 sec., ISO 1600
Click image to view larger
Not all bird photography needs to fill the frame with feathers or be captured in the traditional “close up” style. Positioning the bird in its environment is incredibly beautiful when done well, plus it tells more of a story about the bird and where it lives.
Composition is crucial for these images to be pleasing to the eye. Using the rule of thirds and putting the bird in the “power point” (any of the 4 areas where the lines intersect) and fill the rest of the frame with the background.
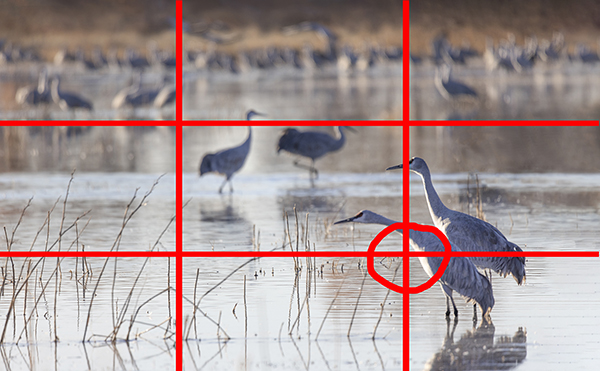
Tamron 150-600mm (600mm), F/6.3, 1/1600 sec., ISO 500
Click image to view larger
Building layers in the image helps tell the story. Notice how the two cranes in the foreground are about to take off. The two birds in the middle are exploring their surroundings while the birds in the back give the viewer information about the expanse of birds in this pond.
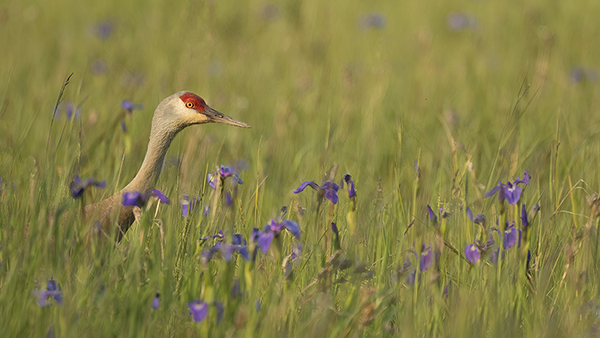
Tamron 150-500mm (500mm), F/6.7, 1/1600 sec., ISO 1000
Click image to view larger
In the image above, the sandhill crane is poking its head out above the tall grasses and wild irises. A tight head-shot simply would not illustrate the story as clearly nor beautifully as this image does. Additionally, it was composed using both the rule of thirds and a 16x9 aspect ratio to highlight the many iris in the marshy area in which this bird is living.
Tip #5) High Key
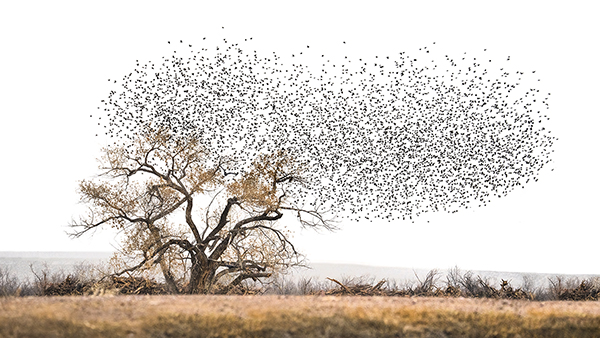
Tamron 150-500mm (278mm), F/6.3, 1/640 sec., ISO 2000
Click image to view larger
High key imagery is my favorite style of photography. The light, bright, ethereal imagery is emotionally evocative, clean, and often simplifies the color palate used in a photograph.
Capturing birds in high-key style can be exceptionally challenging. The light must be just exactly right. At the same time, the bird needs to be doing something interesting, the settings need to be correct in the camera, and more.
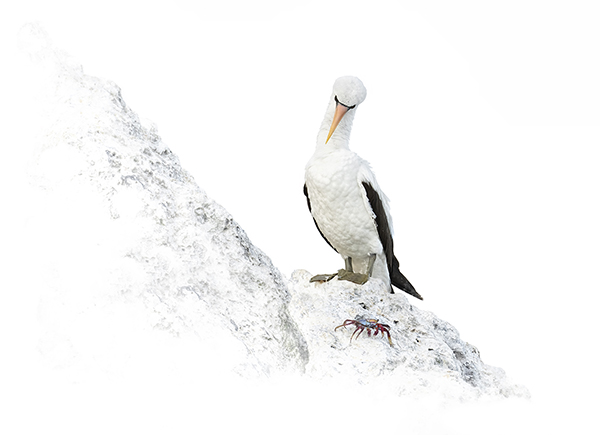
Tamron 150-500mm (397mm), F/8, 1/1600 sec., ISO 3200
Click image to view larger
To start out photographing in high-key style:
• Light: Look for backlit subjects where the subject is much darker than the sky or background. You do not want it to be a silhouette, but you do want the light to create a much darker bird with a bright background. The light must also be diffused (never use front or side light or you will have issues with exposure). An overcast day is perfect for this type of photography. Just put your subject between you and the brightest part of the sky.
• Settings:
- Use settings exactly as you would to photograph a bird normally.
- Next, over-expose between 1-3 stops. Using Exposure Compensation is an easy way to consistently ensure you are over-exposing enough.
- Turn on your histogram in live-view or playback mode.
- Turn on your highlight alerts (often called “blinkes” or “zebras”)
- You are attempting to blow out your background and/or foreground while maintaining an exposure that properly exposes the bird. You may need to bracket in order to ensure you have the correct exposure.
- White balance set to cloudy (if you use RAW images, you may also adjust this during post-processing).
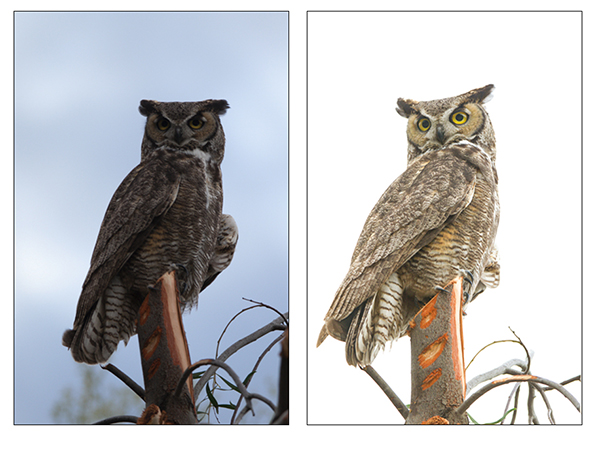
Tamron 150-600mm (329mm), F/6.3, 1/125 sec., ISO 250
Click image to view larger
(Left) The great horned owl is exposed as your camera would “see” it. The camera takes in all the light in the brighter sky and under-exposes the bird. Spot metering can help correct this problem, but it is not typically successful in producing quality high-key images alone. You must over-expose at the level needed to produce white backgrounds, as shown on the sister image (right). This image was over-exposed by 2.7 stops.
During post-processing, you may need to ensure your skies remain white and that your white balance is accurate.
NOTE: Though it is possible during post-processing to select the subject, copy it, and paste it onto a white background, or otherwise make the background white, I find it still will look artificial unless you have incredibly diffused light on your subject. Even then, the look does not typically hold up as well as one done naturally in-camera.
With these 5 tips and techniques for photographing birds, along with your camera and Tamron lenses, you will be well on your way to creatively capturing one of nature’s most amazing and abundant creatures!
About Lisa Langell
Lisa Langell is a full-time, award-winning photographer whose work has appeared in numerous prestigious publications, galleries and more. Whether it was working as a master floral designer, a licensed psychologist, an adjunct university instructor, an international consultant in K-12 education, the Chief Business Development Officer of an education technology company, a researcher, a writer, or artist—she succeeded with each challenge. Still, her calling was photography since childhood when bird watching ignited her lifelong love of nature and the camera. In 2010, she turned her passion for photography into a business. This challenge has been Lisa’s favorite – she loves combines her diverse skills into her photographic art and instruction. Bringing joy to others brings joy to her! She thrives on creating joyful learning experiences that enrich, invigorate, and expand photographers’ minds emotionally, creatively, and intellectually!
Instagram @langellphoto
Watch Tamron Birding Videos
Wildlife and Nature Photographer Lisa Langell with the Tamron 50-400mm Di III VC VXD (Model A067)
Ken Hubbard with the 150-500mm F/5-6.7 Di III VC VXD (Model A057) zoom lens for Sony mirrorless
Kristofer Rowe on Assignment with the Tamron SP 150-600 G2 Lens
More Photo Tips | Watch Videos | Learn More About Tamron Lenses | Photo Gallery