Tamron Blogs
More Photo Tips | Video Gallery | Photo Gallery | Enewsletter sign-up
How to: Shoot Silhouette Photography
Silhouette photography: an easy technique that’s hard to spell
Subtle details, give way to a photograph’s subject, but leaves an air of mystery within its inky black shadows. Silhouettes in photography showcase a main subject seen in shadows against a bright background. This happens because your digital camera sensor cannot accurately capture scenes with very high contrast. In its earliest forms, stories were told through shadow puppet theatres. Either projected from behind on hung sheets or cast upon a wall, people lit by bright lights.
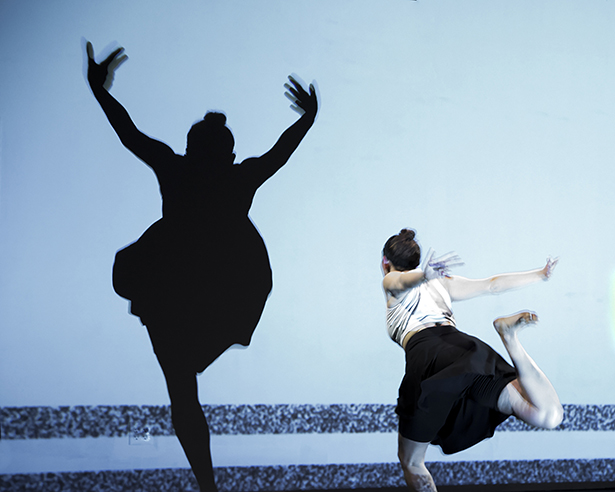
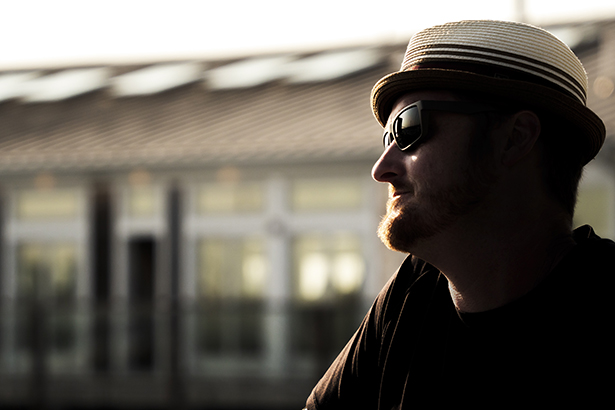
Photographically, you (and your camera) need to choose what to expose properly. If your subject is properly exposed, its background is washed out and white. Ideally, you want the background properly exposed, the subject turns black because of high contrast. Think about photographing a sunset or your friend standing in front of a bright window. These scenes have tons of contrast! By default, your camera is set up with evaluative metering and will naturally expose for the bright background. You have just created a silhouetted subject. Emphasize these silhouettes by slightly underexposing your photography by -1stop E/V.
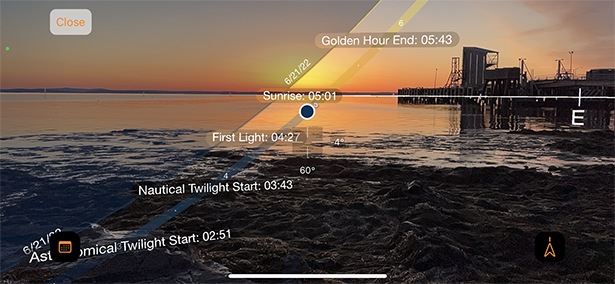
Easy peasy, right? The hardest part is looking for high contrast lighting and positioning your camera to point towards the light source. Now, lets take a second look; I’ll walk through this technique in a more advanced way. Take a moment to look at the sunrise I captured below.

My subject:
Most commonly, Sunrise and Sunsets will set the backdrop for a silhouetted subject. We want a silhouette to have hard lines and easily discernable features. According to the rule of thirds, I should place the horizon line on the lower third line to give visual dominance to the colorful sky. In this case, I chose to raise my horizon. Lifting it into the upper third line gives me the opportunity to include sunrise reflections during low tide. You should easily depict the pier, the tide and get a sense of this landscape without including much visual detail.
My setup:
Using an app to determine the position of the sun, I set up this photo low to the ground on a tripod. My goal was to center the sun and get my best images right before it crested above the horizon. I wanted good saturation and color without a sunburst. Using an app is the best way to time out your morning and to figure out where the sun will rise (or set) in reference to your silhouetted subject. I used the Tamron 11-20mm F/2.8 Di III-A RXD. This lens is a great ultra-wide angle lens perfect for landscapes. The edges of my frame stay straight and bright with its digitally integrated technology (Di III). A tripod was critical because I wanted to be hands free; to sit and sip my coffee while ensuring consistent angles of view in each photo. From set up to satisfaction was about an hour. I also used the remote camera App on my phone to trigger each photo. You can choose to use a self-timer or corded remote, but for me, the App provided by my camera’s brand was easy to set up and easy to use. Look into your camera manufacturer to see if an App is available if you’re interested.
My Settings:
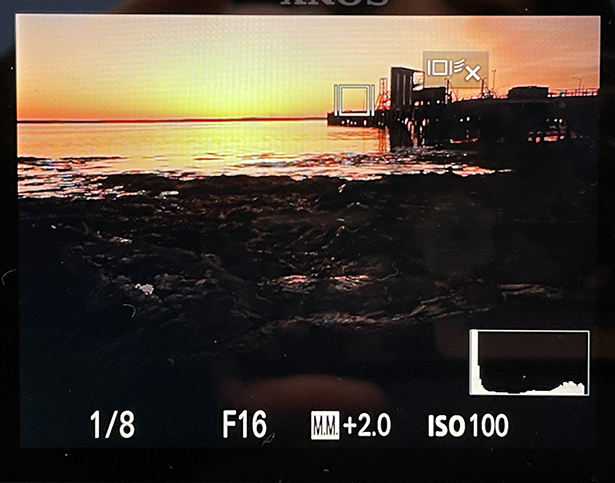
In an advanced silhouette setup, one must be confident in reading and relying on your histogram. I set up my camera in Manual Mode. Set one is thinking about your photo critically, subject-wise. This is a sunrise, a landscape, so my aperture is set to F/16. I also know I want a low amount of noise, good contrast and saturation, so I set my ISO low to 100. The last element in the exposure triangle is my shutter speed. To figure out the appropriate shutter speed for this exposure I first need to make sure I’m metering properly. Instead of evaluative metering, I prefer a spot meter for this situation. I can more accurately read the light/exposure of the sunrise and specify exactly where I want this value read from. In the photo below you’ll see the small square located just left of where the sun will rise. That is where I am metering from. I then concentrate on the histogram. Moving my shutter speed faster, then slower, I find a value that allows the black (far left) values to just touch the left-hand side of my histogram. I want true black tones, but I still want detail. The histogram should not fall off the left edge. You will notice that technically, my exposure is +2 (over exposed)! That is just fine and seems a little backwards. ^_^ Think about it, I’m exposing for the value right beside my brightest point. This value should be close to white, however, the meter will want to turn this value grey, not white. Properly exposed photographs need to include both black and white tones, my meter reading value needs to be slightly over exposed to provide good contrast.
In closing, look for hard light with good contrast. Look for interesting subject matter with hard lines and subtle detail. Look for a good cup of coffee on those early mornings and appreciate a mid-afternoon nap.
More Photo Tips | Watch Videos | Learn More About Tamron Lenses | Photo Gallery