How To Shoot: Action Sports
Two sports in one Colorado day was Grady James' mission: skiing and mountain biking.
By Jenn Gidman
Images by Grady James
Grady James lives a double life in Durango, a small city in southwestern Colorado. In the summer he works construction and participates in a pro mountain-biking team in his off-hours, while in the winter he's a ski guide for Purgatory Snowcat Adventures, which services the Purgatory Resort ski area. "This part of Colorado is unique in terms of the different multi-season sports you can do, though you don't even have to wait for the seasons to change to enjoy both," he says. "You can ski down one of the 14,000-foot peaks in the morning, then drive an hour out to do some biking on the trails in the afternoon."
Somewhere along the line, photography entered the picture. "I'd been a sponsored skier for a while, and part of that sponsorship program meant I had to submit photos I took in the field for social media and marketing purposes," Grady says. "There were a few of us pros in town, and it was easier for us to take our own photos in the backcountry than to recruit photographers. Eventually, I came to enjoy being the photographer as much as the athlete."
Grady uses two Tamron lenses to ensure the sharpest action shots: the SP 70-200mm VC G2 and the SP 15-30mm F/2.8 VC Wide-Angle. "The versatility of the 70-200 lets me capture everything I need in all kinds of situations," he says. "And the wide-angle capability of the 15-30 helps me figure out when and where a fast-moving athlete is going to be heading into my frame so I can prefocus and better prepare. It's a definite strength in terms of helping me provide sharp, in-focus photos for my clients."
The Vibration Compensation (VC) feature on both lenses also helps out in low-light situations, especially with the 15-30. "I'll be in a place where everyone's trying to capture a landscape image, and all of the other photographers around have tripods, because they have wide-angle lenses that don't have any kind of image stabilization," he says. "I'm not restricted on what my composition is because I'm not locked to that tripod—I'm able to walk around and capture sharp, handheld photos."
Here, some tips from Grady on shooting fast-action sports like skiing and biking:
Make sure your gear is ready for the elements.
This might not be conventional, but I wrap my lens in one ski hat and the camera body in another, then put them both in my ski pack or bike pack—I just have to be careful not to fall on my packs. That's about the only extra protection I use.
The thing I appreciate about Tamron's lenses most is the fluorine lens coating, which is terrific for water and moisture resistance and repelling the dust on the bike trails. It's especially crucial when we're skiing. On the day we took the pictures you'll see in a bit, the winds were blowing fierce. The snow kept hitting my lens, but it was really easy for me to wipe it off now and then and just keep shooting. I didn't have to stop and tell everyone to hold up every time I got snow on my lens.
Use back-button autofocus.
I'd recommend this technique for anyone shooting action sports. Google the term and you'll find tons of stuff on the Internet on setting up your particular camera for it. It really gives you a lot more power in controlling what you're doing in your photos when it comes to action shots.
Precompose and prefocus.
Instead of following my subjects as they come down the mountain, I'll have my camera set up in the composition I want, knowing they're going to ski through my frame. I prefocus on the spot I've chosen and then wait for them to come through it; then I start pressing the shutter button and keep shooting until they've exited the frame. This ensures the best composition, because you've already nailed down where the light is, where the sky is, maybe other elements like a tree that you know you wanted in there.
Figure out how to communicate with your subjects.
Knowing your composition is one thing; being able to communicate that to the athlete is the other half. You need to be able to tell them, "OK, I want peak action 3 feet out from the tree, and 2 feet uphill of it."
Mountain biking is a little easier, because you can walk close to your subject on the canvas and leave no marks. On the ski slopes, however, you need to keep that untouched, pristine powder for effect. Often I'll communicate with the skier by throwing a snowball into the spot where I want him or her to head.
Plan out what your background will be.
That's going to depend on what the objective is for the shoot. If I'm trying to get a specific shot for a ski goggle brand, for example, then obviously I'm going to be focused on getting the right angle to make the goggles pop. But if the image is for, say, the resort, my quest isn't to show specific gear on a skier—I want to show where we are, with the peaks in the background all lit up, so I'll angle myself to compose the photo accordingly.
Opt for all-natural light.
I don't use artificial lighting, mainly because most of the places I'm shooting in are so remote that carrying more than one camera body and one lens can be unwieldy. Sometimes I'll carry two and people will say, "Dude, that's nuts!" You have to minimize the weight you're carrying on the slopes and trails. You don't really need to use a flash anyway for most ski photos, since it's such a white background—there's a lot of bright light around.
Keep track of the sun.
For ski photos, it's almost mandatory to shoot in the early morning or later afternoon—as soon as the sun is way overhead, it gets too bright. We call that "hot light," because it gets so bright it overexposes everything. In December, you can sometimes get away with shooting ski photos all day long, just because at that time of year the sun stays low in the sky all day, but by the time you hit mid-January it's too bright at noon and you can't shoot as effectively.
In terms of mountain biking, you're usually in the shade more. The restriction in terms of light comes if you're shooting in a dark forest area. It's better if it's kind of overcast overall: If you have a sunny day and you're in a dark forested area, there's always a bit of sunlight that sneaks through the canopy and lights up certain spots, and in your photos that tends to drown out the rest. Then you have to pull shadows in Lightroom and it gets kind of noisy.
Determine your baseline shutter speed.
When I'm taking ski images, I don't go any slower than 1/1000th or 1/800th of a second; for biking, I'll drop it down a bit to maybe 1/500th. I always shoot manual, but if you're just starting out with action sports photography, you can opt for shooting in Shutter Priority mode. That way you don't have to worry initially about getting the correct aperture for a given ISO.
Some further ideas, using as examples some of the images I took for a recent two-sport-in-one-day adventure:
Show off unique aspects that people who know the sport will understand.
I don't normally shoot ski photos all that often with a telephoto lens, but the day we were on the slopes provided me with that opportunity. The sweet thing about the line shown in this first image, and what I wanted to portray for the viewer, is that we were skiing a really expansive piece of terrain. People familiar with backcountry skiing will have even more of an appreciation of it, because they'll know the conditions required for avalanche hazards—it's not often you can ski a line that big in Colorado. Plus, instead of cropping the image really tight, I left a bit of the sky exposed, so I could have those leading lines leading up to the horizon. If you look at the ridgeline up top, you can see some snow blowing off of it. It doesn't look that bad in the photo, but when people who were there see it, they'll remember how the wind was blowing at 50 miles per hour that day. It adds to the story.
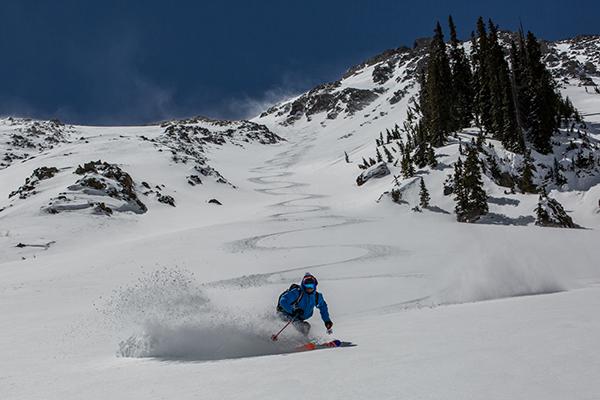
70-200mm (70mm), F/11, 1/1600th sec., ISO 200
Capture expressions and emotions.
It was Dylan's first time skiing along this particular line, and it shows in his expression just how excited he is. It's really special to be able to ski nonstop along that kind of line, and I wanted to capture that emotion. I was able to do this without even showing the skis or his poles. Between his big smile, the goggles he's wearing, and the ski turns bokeh'ed in the background, you can tell exactly what's going on and that he's the skier who just conquered that run.
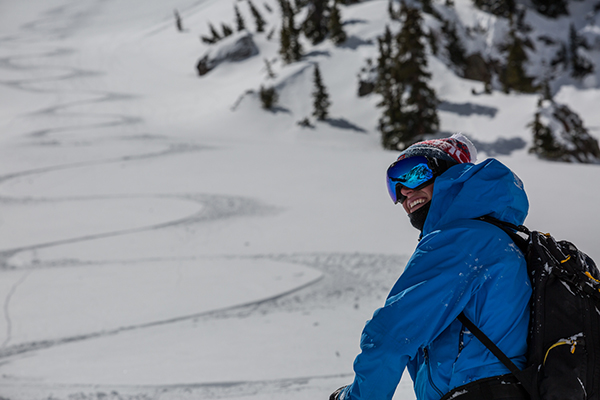
70-200mm (200mm), F/11, 1/1600th sec., ISO 250
Take advantage of the fast focusing of the 70-200.
And here we have Dylan again. We'd found a gentle, serpentine section along one of the trails, and he rode about 60 yards of the trail while I took pictures. I didn't do any prefocusing for this photo. I looked directly up-trail while he rode straight toward me, and I just started shooting sequences as he got a little closer. The quick autofocus of the 70-200 helped me pull this off and still get sharp images. It was helpful because I didn't have to set up every time we headed over to a new section.
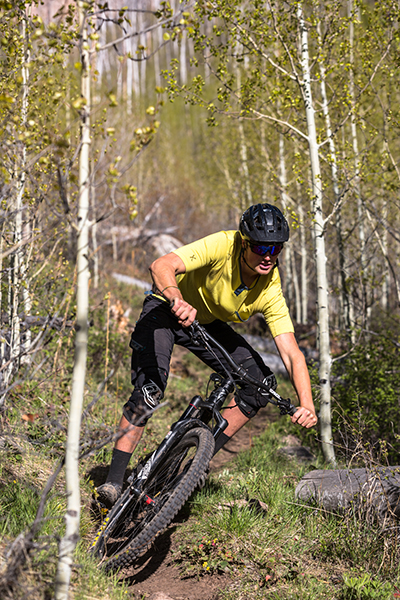
70-200mm (92mm), F/4, 1/2000th sec., ISO 160
Show off aspects of the environment that tell a story of the area's history.
There's a trail off of Missionary Ridge that's about 5 miles north of Durango. That entire ridgeline caught fire in 2002—it was one of the largest wildfires in Colorado history. The trail we were riding through is a burn area, so there were all of these awesome, dead trees with this cryptic look to them. My goal was to show them off, because even though they're dead, they're still beautiful. I waited until I could capture this rider in the air, angling my camera so I could compose the trees in their entirety stretching up into the sky, silhouetted.
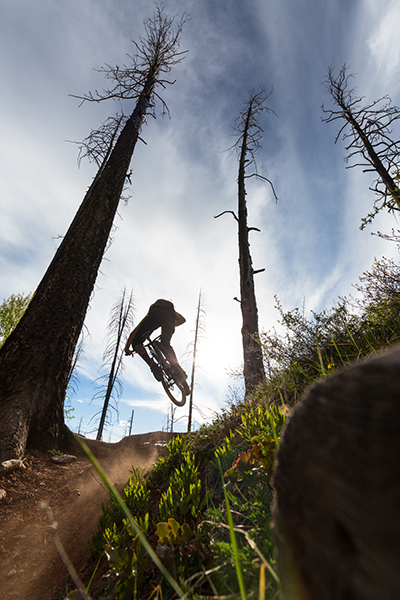
15-30mm (15mm), F/8, 1/1000th sec., ISO 200
Seek out elements to anchor the photo or complement your subject.
Our friend Sara was skiing that same morning, though not with us, and we ran into her in the afternoon and told her we were doing a ski-and-bike deal in one day. She said, "No way, I'm doing the same thing!" We made her part of the bike session of our shoot.
As far as the photo you see here, I spotted a yucca plant on the side of the trail. It offered a cool contrast to what we were shooting earlier in the day and really epitomizes what I was talking about earlier. In Colorado, you can be skiing one minute, and then a couple of hours later be mountain biking in another location. The viewer can look at my skiing photos, then this one with the yucca plant, to really get a sense of both of the differing landscapes and lifestyles that you can enjoy all in one region.
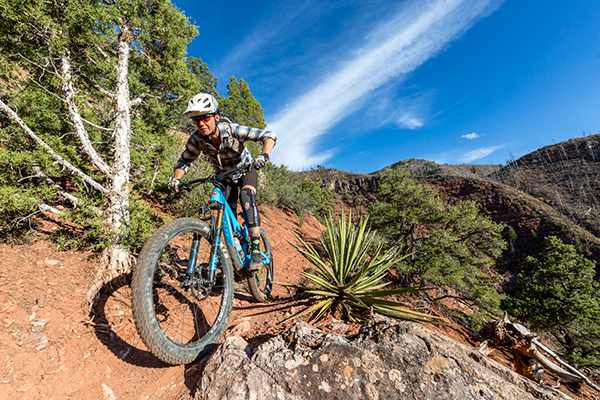
15-30mm (15mm), F/14, 1/500th sec., ISO 800
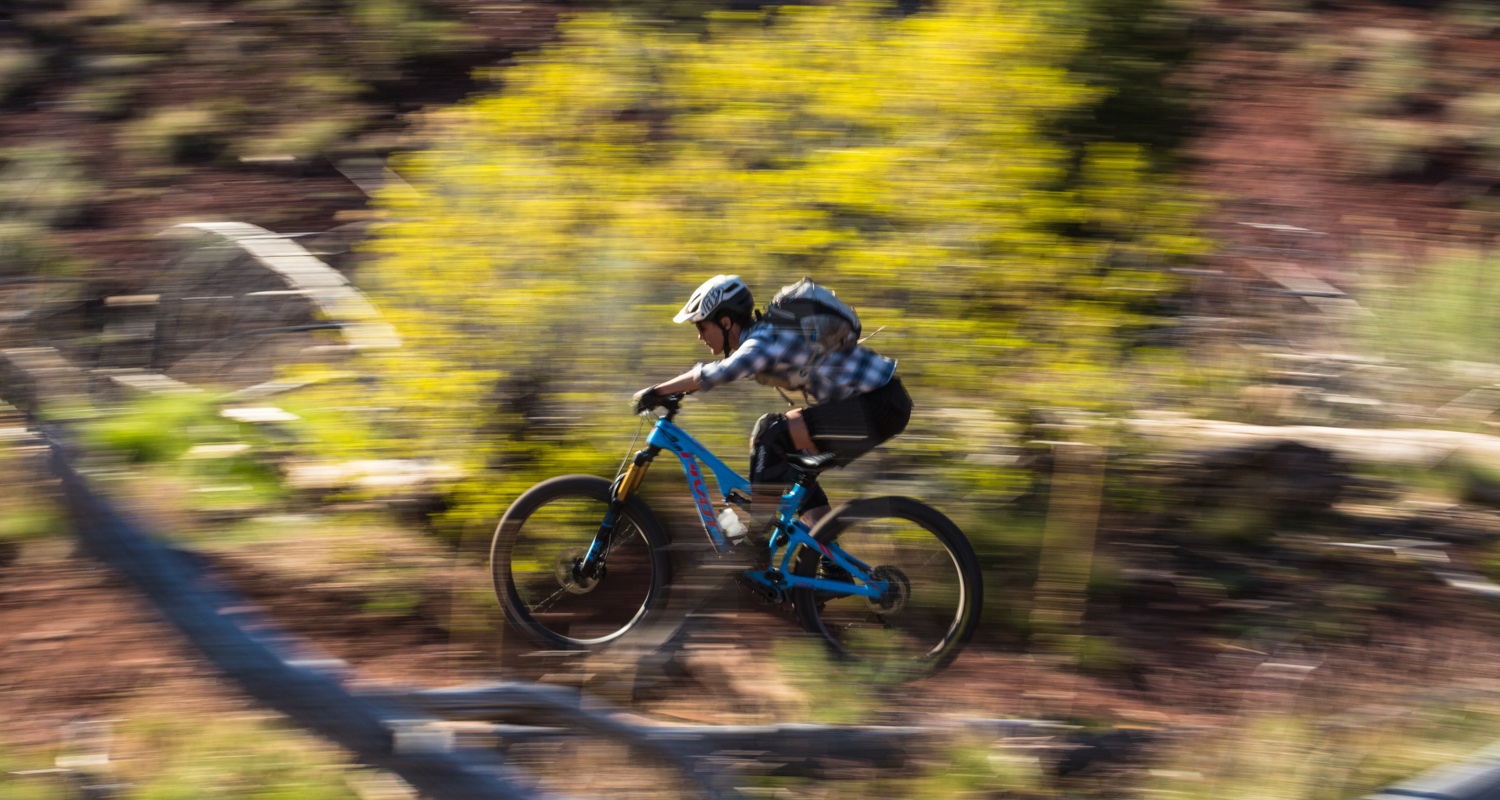
Pan and prefocus.
I captured Sara one more time zipping across one of the trails, and this one was a panning image. My go-to shutter speed for this kind of photo is 1/30th of a second; I'll adjust it from there, depending on what I see after a trial run. With pan shots, I simply try to prefocus on the trail, then follow my subject as smoothly as I can as he or she travels up and down the path. The 70-200 is the ideal lens to use for this kind of photo. I actually had a couple of those images in the same spot featuring a biker with a yellow jersey, but Sara's photo came out best because she had a better shirt to contrast with the background here.
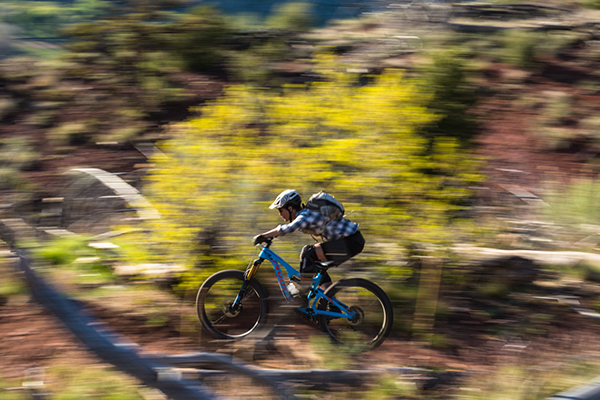
70-200mm (70mm), F/22, 1/30th sec., ISO 250
You can take photos from anywhere—even your car.
Dylan was driving us back into town from Sultan Mountain, and as I was going through my camera to see some of the images I had taken, I happened to look out the car window to see Sultan. It looked really cool, so I started taking pictures while he was zooming along at 60 miles per hour. That's the neat thing about Colorado: You can get sweet shots like this simply by rolling down your car window.
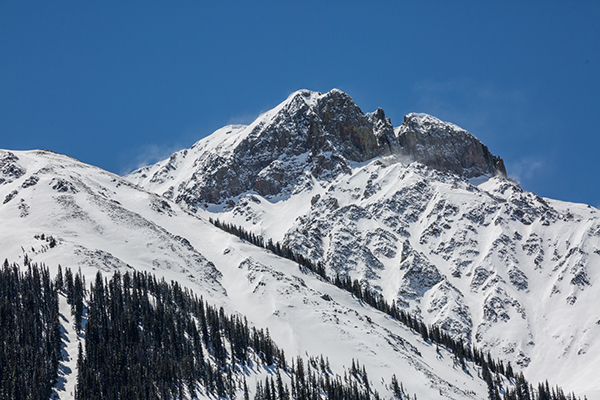
70-200mm (200mm), F/16, 1/640th sec., ISO 400
To see more of Grady James' work, go to https://www.gradypjames.com/.