The Pretty Side Of Cycling
Hernan Rodriguez uses the Tamron SP 24-70mm f/2.8 Di VC G2 & SP 70-200mm f/2.8 VC G2 lenses to capture the finest sides of a professional female cycling champion, making it more than just about the bike.
More Photo Tips | Video Gallery | Photo Gallery | Enewsletter sign-up
Article & Images By Hernan Rodriguez
Here is a brief glimpse into Scotti’s life, which will help set the stage to her personal timeline, shared in these captured images.
Meet Scotti Lechuga: Professional cyclist, wife, mother of two beautiful 6 year old twin boys, fitness coach and coffee addict. She is one of the few mothers in the sport of professional women’s cycling.
Working as a Los Angeles based commercial portrait photographer my work spans from personal commissions to celebrity and editorial assignments. When I was selected to photograph Scotti, it was not merely for my style and artistic vision but also because I shared a deep passion for cycling, stemming from the many years racing in the elite category. “I believe you will understand where I am coming from”, shared Scotti, and that is what essentially sealed the deal.
Setting the Stage
Since Scotti lives in Arkansas, all the preliminary planning and concepts were discussed over the phone and through emails. Scotti was very direct on some specific shots she wanted to capture from the session. “The rest I leave to your artistic and creative interpretation”, she added. As usual, I created “mood-boards” which displayed the wardrobe, lighting style, studio backgrounds and environmental locations for each shot. This is collaboration between photographer and subject, so I had Scotti email me 15 inspirational pictures she admired. This step also helps ensure the photographer is on the same page as the client. Once Scotti reviewed and approved the boards, we both had a solid idea of what direction we wanted to go with the photo shoot. I also explained to Scotti that these were for reference and inspiration. Many times during a shoot, you might find something that works better, or head in a totally new direction.
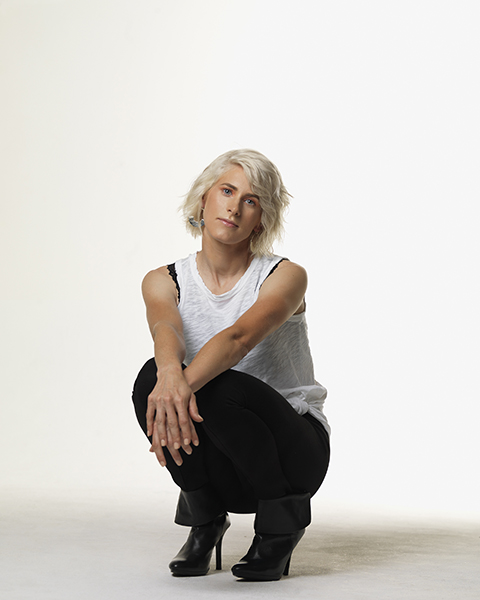
One thing that was certain though, was that we were going to shoot many changes and looks. A classic vintage look, two sophisticated fashion looks, a hybrid shot of cyclist meets fashion, two looks that revealed Scotti’s inner person, and of course, two looks with Scotti and bike. She also arrived with two beautiful carbon fiber bike frames granted by her professional sponsor. This one I thought we would have fun with and make it more of a conceptual shot. She agreed.
Tamron 24-70
For the most part, I used the Tamron SP 24-70mm VC, for the versatility of its zoom range, which allowed me to cover the various shots we had planned. All except for the tight sophisticated beauty shot, in which I used the Tamron 90mm. I usually will use the Tamron 70-200 for the majority of my fashion work, but since I was shooting full length and ¾ shots combined with a bike and frames, I thought the 24-70 would be a better fit. This lens alone would also cover that 45mm – 50mm range, which is great for full-length fashion and environmental portraits. I also had just received the new lens two days prior, so I was very excited to see the new added features and upgrades. I was shooting many setups with both strobes and continuous lighting, so the lens would have to perform well through the varying f/stops. The fast f/2.8 would also assure the option of creating beautiful creamy backgrounds, and keeping the focus on Scotti.
One thing I find concerning or rather important when shooting fashion and portraits with continuous lighting, is finding the best camera setting combination allowing me to create clean sharp images. You are bumping up the ISO, dragging the shutter speed to very slow speeds, or opting to use a tripod, which sometimes can disrupt the flow of the photo shoot. This mid-size powerhouse lens performed way beyond my expectations. It allowed me to keep the ISO to a minimum of 100, while relying rather on the Vibration Compensation feature to compensate for the low light. I found myself easily dragging the shutter speed 4 stops, while going hand-held to 1/15th of a second on Scotti’s Vintage setup, which was shot with one “hot-light”.
Tamron was the first in the market to have a vibration compensation option for a 24-70mm lens, and this “next generation” G2 has just gotten better. With the quick focus, even under low-lighting conditions, I was able to work freely with Scotti, covering a range of poses as we moved and talked throughout her session. This allowed me to capture honest and less contrived expressions. It is a practice I use which can be helpful to both portrait and fashion photographers.
It Takes A Team
Leading up to the shoot, I usually start by building up my core team, which is integral to the success of the photo shoot. They consist of makeup artist, hairdresser, wardrobe specialist and a personal assistant. This assistant will sometimes work on specific needs I might have and will also delegate certain instructions to the rest of the assistants when they may be needed. Certain tasks might involve shopping, catering, music, grip, and more.
Prepping For The Shoot
Once we agreed on the storyboards, the next step was preparing the stage for the various setups. This is not any different to when I shoot my celebrity portraits. This preparation is extremely important as it helps keep a constant flow throughout the day, and it also leaves less room for error. During this process, I will usually test my equipment along with my lighting gear and make sure everything is working and up to par. As far as lenses go, from my years of experience, I will usually know which lenses I will be using. In this case, since we were shooting in that mid-range focal length, I was very certain the Tamron 24-70 would be all I’d need for the session. I also buy new batteries for all of my triggers, and I pre-cut any Rosco filters for the shots that will be customized for the use of color. I make sure all of my digital media cards are formatted and ready to shoot. If I am shooting tethered, I pretest to make sure all communication channels are working. One last thing I do the day before the shoot is to create a “Call Time” sheet which specifies everyone’s contact information, location of shoot, everyone’s arrival time and lunch break. This can be a time saver and a lifesaver as well.
Step 1: The first step I take is to breakdown the storyboards into groups that will have the same type of lighting style. Here I can also determine further if it will be grouped with flash or continuous lighting setup. I usually will pre-test the day before and I also will have an accompanying notepad with settings, including ISO, exposure and color filter selection noted along with custom white balance notes. I might also keep a custom white balance CF card for each setup, which allows me to keep consistent color from set to set.
Step 2: Here I determine the background selections for each setup and the accompanying wardrobe, whether casual or upscale. I usually will use a wide range of solid colored seamless paper from Savage Universal. In my opinion it keeps the focus on the subject and maintains a sense of timelessness. I will also use one setup for a classic portrait appeal, using a custom painted canvas by www.seamless.com. This background will usually be set back far enough from the subject, and shot with a shallow depth of field. I usually will shoot this at f/3.2. I also have a setup for black and white, which will have a higher lighting ratio to create more contrast and pop.
Step 3: In my opinion, this is the most important point to note. Make the client as comfortable as possible. Not only physically comfortable in the studio, but just as important is gaining the trust of your subject. Usually everyone’s a little apprehensive about that initial shot. This was Scotti’s first professional photo shoot, so we dialogued a lot and I made sure she was not feeling rigid throughout her shoot. The dialogue helps the subject get out of their headspace, where they might tend to overthink things. This will translate to very rigid posing. The tendency is for the subject to usually go to the “cliché” hand on the hip pose. I will tend to pose less and let the subject fall into their natural body language expression. I just then slightly refine the pose by repositioning hands and feet, or head tilt. As you will see in the example images of Scotti, her expressions are natural and her poses are fluid.
A Pro On And Off The Bike
We covered multiple wardrobe changes for Scotti, so I will share some of the standout images of the session, and the specifics of the shot.
Tech Notes: In all of the setups where flash was required, I used a Dynalite Kit, which consisted of 3 power packs. 1 RP1600, 1 MP800, and 1 MP400, in combination with the RoadMax Series Heads and the SR3200 Ring Flash. 2 Portable Baja’s were used on location.
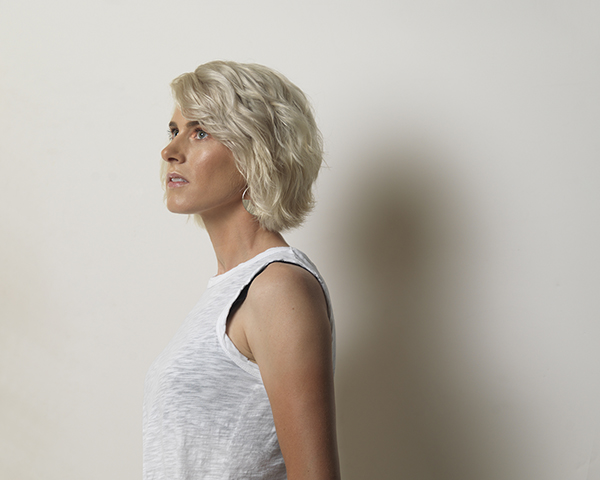
Setup 1. Was our “Ice-breaker” Shot. I wanted to have Scotti be as natural and comfortable as possible. For wardrobe we selected something a bit understated as to let her expressions dominate the portrait. I had Scotti wear a free flowing white tank top and black fitted athletic pants. This allowed her to show some of her fitness as well as her personality. Her low cut boots gave the outfit a fashionable appeal.
SP 24-70mm, 50mm, f/6.3, 1/125 sec, ISO 125
We began in a white studio cove and lit the background with 4 flash heads. Two bare bulb flash heads were placed one on top of the other and bounced off of a V-Flat on each side, for an even spread of light. All four lights metered f/11 on the background. This was 1 EV above the key light. The key light was a large Westcott Zeppelin Parabolic without diffusion. This light metered f/8. For fill, I used two flash heads placed in a reflective umbrella directly behind me on each side. This was a combined exposure of f/7.1.
The Tamron 24-70mm allowed me to capture a series of shots that varied in focal length. Most often I use the Tamron SP 70-200mm f2.8, but by using a shorter focal length, I was able to stay closer in proximity to Scotti, which allowed us to interact more intimately. It’s great when you also need to direct the subject through a variety of poses. I was also able to quickly shift between full-length shots, to ¾ horizontals for an asymmetrical look, which gave us the option of using it as a website banner.
SP 70-200mm, 11mm, f/8, 1/125 sec, ISO 125
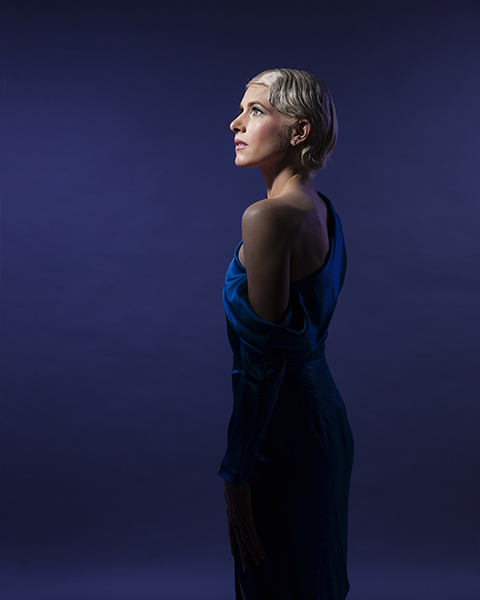
Setup 2. The second shot was a variation of the first setup. By placing a black V-Flat directly behind Scotti, I was able to quickly switch to a more classic sophisticated look. The lighting setup was kept exactly the same. I had Scotti change into a cobalt blue blouse, which really made her eyes stand out. I wanted this series of images to display her confidence and strength while still showing her femininity. Nothing changed in relation to lighting and exposure. This made for a quick transition with a completely new look for Scotti.
SP 24-70mm, 63mm, f/7.1, 1/125 sec, ISO 125
Setup 3. The next shot was also setup to have an easy transition, with a slight lighting variation and background change. A quick setup of a Savage Gray seamless paper on stands was placed behind Scotti. The key light was kept the same with the Westcott Zeppelin Parabolic. We kept the same distance and power to maintain consistent lighting at f/8. I also wanted to create an overall open fill, so instead of using the two umbrellas for fill, I used a 72”x72” Westcott Scrim Jim in its place. I simply just placed two Dynalite flash heads set far enough behind the scrim, to create my fill using the full size of the scrim. This light quality was smooth, similar as to a large bay window. It also gave me just enough detail and separation from a black bike against a gray background. Since this setup was to be shot full-length with Scotti’s bike, we needed to make sure we had plenty of space around the scene, as to create a clean image that could be used for advertising or editorial purposes. Most photographers make the mistake of viewing the shot through the lens, and crop in too tight. This limits the image from being used for multiple purposes. You also have to make certain the transition of light onto the subject and background are smooth and consistent.
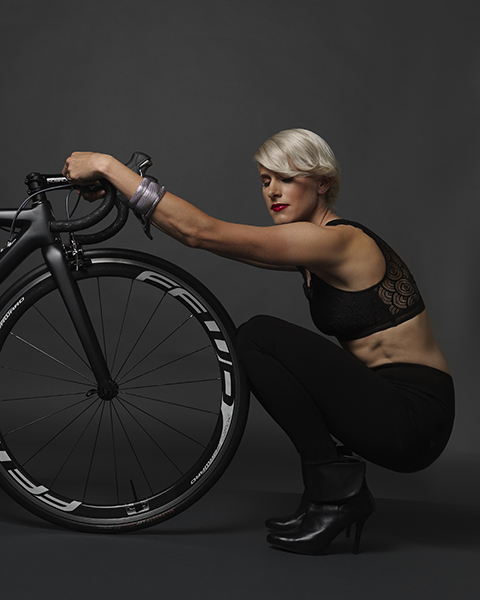
SP 24-70mm, 50mm, f/6.3, 1/125, ISO 125
The Tamron 24-70mm f/2.8 was the best lens option for creating this series of shots. I was able to choose my angle of view, and varied my focal length from 45mm-70mm range for these particular shots. Since the bike was positioned behind Scotti, I also wanted to secure an accurate perspective. I also captured tighter shots by simply walking closer to Scotti, while maintaining my focal length at 70mm. This series of images were some of my favorite shots of Scotti. It presented her as she truly is – A female professional cyclist with a great sense of fashion.
Variation – Since the background and lighting style of this setup covered many looks we had storyboarded, I simply had Scotti jump into two more changes to keep the flow of our day fluid. The wardrobe, posing and expressions are what varied for these shots.
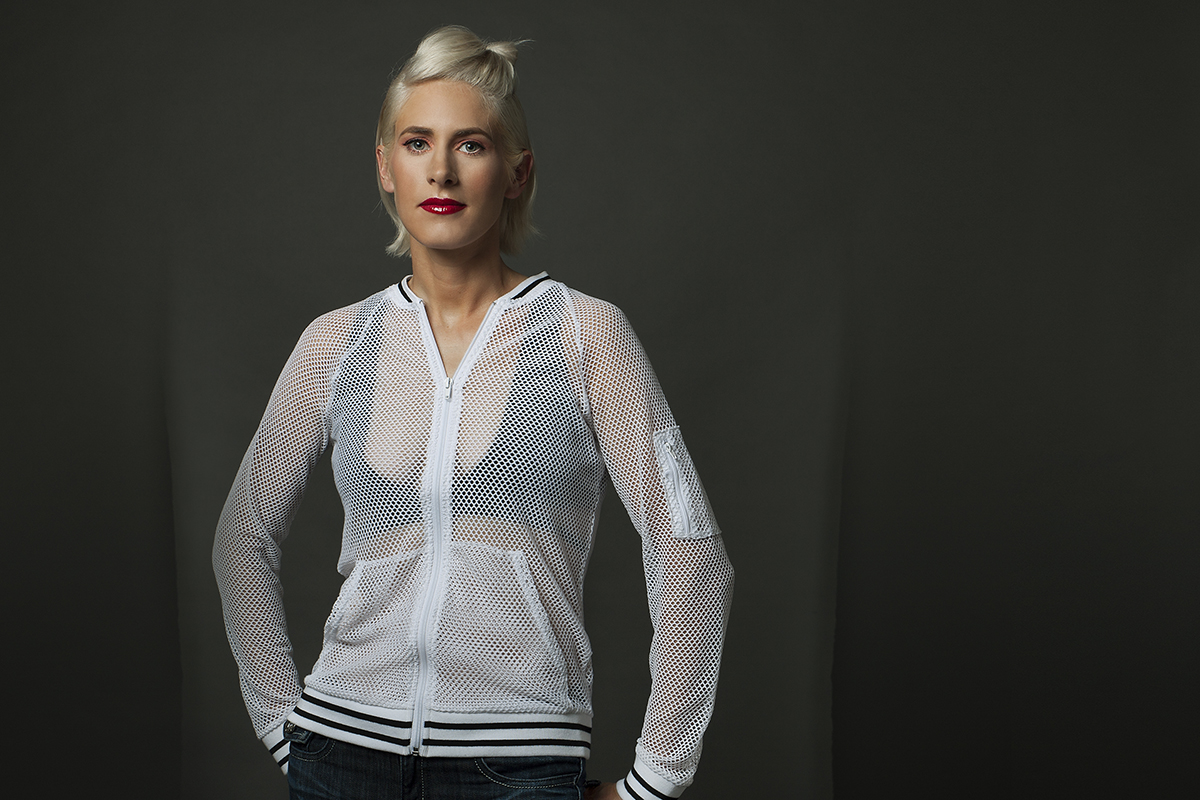
I had Scotti change into a fun expressive outfit to show off some of her funk and “cool” side. Most people might think female cyclists don’t have a life outside of their bikes, or just don’t have a good sense of fashion, but Scotti was the complete opposite. She was fun, possessed a great sense of fashion and was very assertive in her choices. I wanted to show some of that in this next series. I directed Anthony, my makeup artist, to create a bolder look by adding more depth to her eyes, and a bold red lip color. Her hair was also pulled back into a stylish knot. For wardrobe, Scotti changed into jeans with a black sports top, and layered on top was a white mesh athletic jacket that completed the look. I took a series of ten quick shots, which completed this wardrobe change.
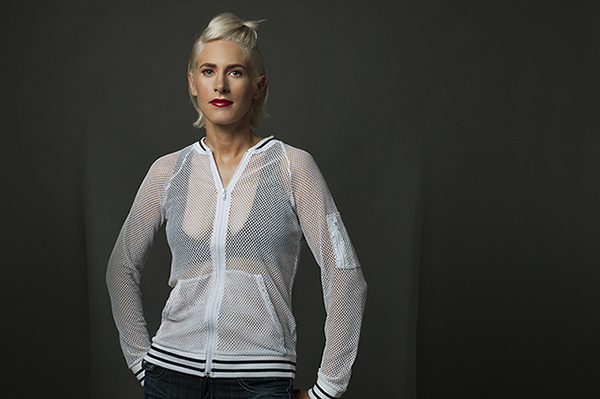
SP 24-70mm, 44mm, f/8, 1/125 sec, ISO 125
The Tamron 24-70 rendered amazing accuracy on the representation of skin tones. To any portrait, beauty and fashion photographer, that is the number one objective. Making sure the color balance is accurate, and the dynamic range in the skin carries enough latitude. I was very impressed. I am sure you can find a lot of literature on these specs for the 24-70, but in my testing, I am sharing this through these portraits.
Setup 4. The next shot was to capture Scotti the “mother.” Not much change here again. Since this shot was Scotti and her twin boys, all I needed to do was to pull back the large parabolic to allow more spread of light onto three subjects. I also increased the power on my Dynalite pack to compensate for the loss of light. I took a final meter reading to f/11 for light consistency.
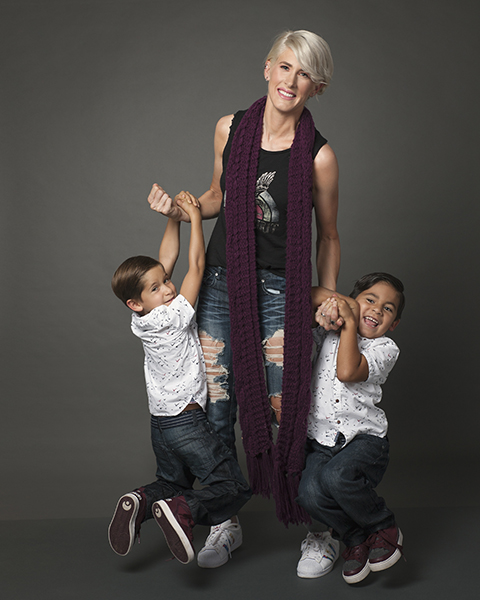
SP 24-70mm, 48mm, f/6.3, 1/125 sec, ISO 125
My Tamron 24-70mm was quick to focus and also gave me the ability to adjust my focal length constantly. I turned off the VC feature for most of my studio shots, since the flash was enough to keep images sharp and my shutter speed also was high enough to keep tack sharp images.
NOTE: When shooting under mixed lighting conditions, continuous lighting and natural light, I will keep the Vibration Compensation on. Though I will be using flash, I also keep my shutter speed very low to allow ambient exposure. The speeds might vary from 1/15th of a second to 1/60th, depending on the effect and lighting conditions.
I directed Scotti to just have fun with the boys. “Let them hug you, hold onto you, kiss you” I instructed her. I didn’t want anything posed or contrived, so by the constant movement and interaction with her boys, it gave us a great variety of portraits and kept it fluid and organic. By pausing and directing my subjects to pose might have stopped a natural moment from occurring. As a photographer you need to discern when to pose your subjects and when to allow them to just be expressive.
This was really fun for all of us!
Setup 5. Now we step into our fashion segment with Scotti. From our storyboards, we had determined three specific fashion looks. One a vintage change, another a sophisticated look and lastly was a bolder look incorporating color and contrast.
Vintage. Scotti brought a classic off-white vintage dress, which I thought was perfect for creating a 1940’s style portrait. Hard light, deep shadows with high contrast. To replicate this period, we started with another hair and makeup change. The stylist created a period hairstyle with tight waves of hair pinned closely together. This also framed her face nicely. The makeup contoured her cheeks and a deep rose lip color was used instead of red.
SP 24-70mm, 48mm, f/8, 1/125 sec, ISO 125
With the varying lighting scenarios we had set to shoot, I needed a lens that would help control camera shake, especial when shooting under lower-light conditions. The Tamron 24-70mm Vibration Compensation (VC) technology, which allows photographers to shoot as many as five shutter speeds slower than usual when shooting hand-held, allowed me to confidently capture every shot under constantly changing lighting conditions, even with low ambient and continuous lighting.
I started with the same Savage gray seamless paper, which kept the focus on Scotti and also worked well for black and white conversions. To create that classic Hollywood style portrait, we decided to use just one “hot-light”, just like they did in the Ol’ Days. I really never use these lights as they tend to get extremely hot and are a bit cumbersome, but there was one sitting around the studio, and I thought I’d give it a shot. Because of the extreme heat, we shot this setup in just five minutes. I clipped on a set of barn doors to direct the light.
While Scotti was in makeup, I turned on the light, did a quick white balance with a SpyderCHECKR gray card, and uploaded it as a custom white balance. The Kelvin for the light was 3200.
Now this is where the Tamron 24-70mm VC is extremely beneficial. With the newly dedicated MPU (micro-processing unit) solely for Vibration Compensation, you have the flexibility of using much slower shutter speeds with the stabilization performance level of 5 stops.
Due to the heat emitted from the light and to make our subject confortable, we varied the distance of the light to the subject, which also varied our exposure settings. For minimal noise I kept the ISO set at 100, and relied more on the VC feature to compensate for the slow shutter speed. We shot this series in the 1/15th – 1/50th of a second range at f/3.2. The slow shutter speed also allowed me to create a lot of detail in the fabric shadows by picking up some of the weak ambient light for fill.
Bold Fashion. In our storyboards, I had diagramed a lighting setup with a very specific look we were hoping to create. When I mention, “hoping”, it’s because we had not tested. Most often with my lighting experience, and my familiarity with my equipment and modifiers, I usually am close to the mark. Sometimes it only takes small adjustments, or maybe it’s a starting point for something even more fantastic. Without my sketchpad though, it is very difficult to just arrive at these types of shots.
The inspiration I took from a 1940’s fashion image, which had a high-contrast lighting style. I decided I would light this with a hard and directional light source. For my key light I used a bare Dynalite flash head with a sheet of Rosco Opal diffusion paper to minimize some of the brightness and hard light edge. After a proper white balance, I also added a Rosco Calcolor 15 Cyan filter to create a cool mood. The light was positioned from the side and relatively high up for a more dramatic effect. For the background, I used two more Dynalite flash heads with 36” black and white umbrellas, bounced onto the same Savage gray seamless paper. To create a more graphic image, we added a Rosco Calcolor 60 blue filter on each light. This along with the bolder makeup added on Scotti created our take of a 1940’s vintage fashion look.

SP 24-70mm, 53mm, f/8, 1/125 sec, ISO 125
Fast and Accurate. Under these low-light studio conditions, the Tamron 24-70mm excelled in capturing focus even after focal length readjustments. This was very apparent in our bold fashion shot, where we were only able to focus with weak modeling light in a dark studio setting. This is in part due to the embedded DSP (digital signal processing) blocks that enable high-speed digital signal processing. We were able to achieve quick responsiveness from the camera’s AF selection point to the lens.
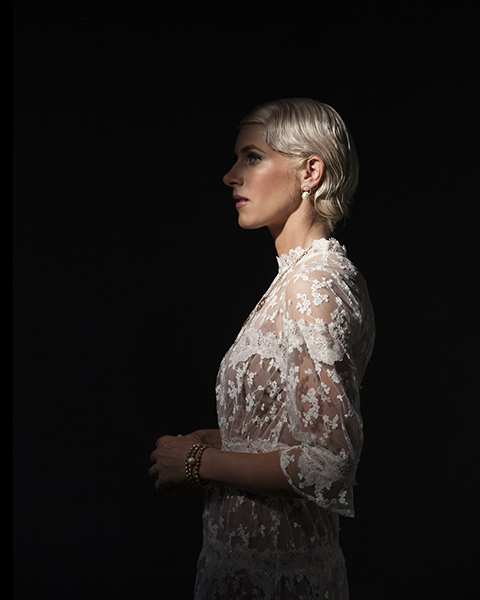
Class and Sophistication. This is how I can describe the last look in this series. Scotti stepped out of wardrobe in a black elegant sheer blouse. Nothing overstated but none-the-less, with a timeless appeal. Her hair was pulled back, which gave notice to the added jewelry Scotti displayed, and a touch of blue eye shadow was added to pronounce her beautiful blue eyes. To add to the timeless appeal, I thought it appropriate to shoot on a white background, and allow the light falloff to add the right amount of depth. I decided to shoot with a Savage Translum white paper roll, which is not 100 percent opaque, but it’s rather more of a velum translucent paper, allowing me to place a flash head behind the paper roll. This created an extra kick of light on the background but not obvious as if I were to use a spotlight directly in front of the background.
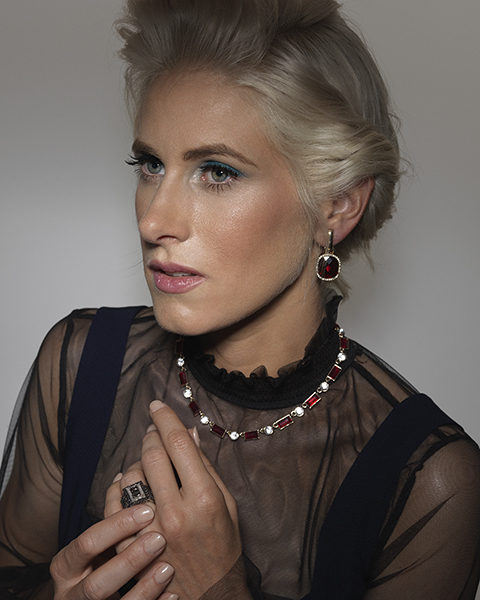
SP 70-200mm, 111mm, f/8, 1/125 sec, ISO 125
The lighting was very tight and precise without much movement allowance for my subject. We spent four hours on setup to construct specific lighting characteristics from this look. I wanted to create a lighting style between a classic portrait and the specular quality you might see in fashion photography. I specifically wanted the light focused on the front plane of her face and graduating darker above her forehead. I also did not want an obvious spotlight effect either.
One thing I found impressive about the Tamron 24-70mm was the flare and ghosting control it offered. The multiple-layer coating techniques of the lens provided superior anti-reflection performance, especially in backlighting portraits as in this particular portrait. I can also see how this lens would be a perfect fit for any product photographer, as it also captured Scotti’s ruby and diamond accessories with sharpness and clarity. Something most commercial photographers strive to accomplish in their work. This is attributed to the new specialized, high quality glass elements.
For the main light I used a Dynalite flash head with an18” beauty dish, fitted with a grid and fired it through a Westcott Omega reflector. The shape of the reflector served as a gobo to create the shadow around the face, while keeping the brightness in the center of the face. I also used multiple black boards to control the light falloff and block direct light from striking the lower part of Scotti’s dress. The main light was metered at F/11, four feet from my subject. As a fill light, I used two 36” white and black umbrellas metering F/5 each. I varied the contrast throughout this setup by using either one or two fill lights. The fill was set to the left and right of my subject to create non-directional open fill.
Money Shot. From all of our shot storyboarded, this is the one shot Scottie was counting on as her money shot. She wanted to create an avante-garde fashion shot using her sponsor’s bike frames, which would be able to be used for commercial advertising purposes. The lighting we used was the same, but we added a Dynalite Ring Flash set at a low angle for specular fill. This light was metered 3 stops less than the main light. We also switched our background to black velvet, which really made the frames standout. Scotti also had a makeup change to a bolder and graphic look, adding bright orange eye-shadow and blush to match the bicycle frame.
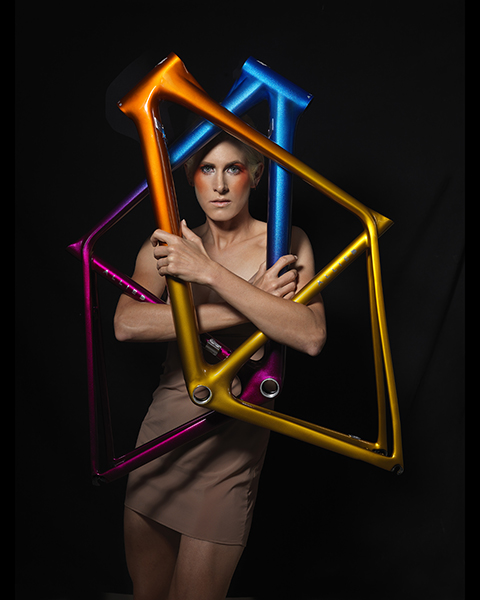
SP 24-70mm, 70mm, f/7.1, 1/125 sec, ISO 125
The Tamron 24-70mm is such a sophisticated lens and in a class on its own.
More Photo Tips | Watch Videos | Learn More About Tamron Lenses | Photo Gallery