Mirrorless on the Move
Shooting mirrorless allows Cecil Holmes to travel lighter, with his Tamron lenses along for the easier ride.
More Photo Tips | Video Gallery | Photo Gallery | Enewsletter sign-up
By Jenn Gidman
Images by Cecil Holmes
For obvious reasons, mirrorless cameras are typically lighter and more compact than DSLRs, though some photographers hesitate to use them because there simply aren’t as many lens and accessory options. But not only does Tamron make dedicated lenses for mirrorless cameras, but many of its other lenses can be easily attached to mirrorless cameras using the manufacturer’s adapters.
Cecil Holmes has been using both options for years, first with the Nikon Z series, and now exclusively with his Sony a7R IV. “I used to have to lug two camera bags to carry everything I needed when I was out and about,” Cecil says. “The new Tamron lenses are so compact and lightweight, however, that I can get everything I need into one bag. My recent decision to go mirrorless, totally with my Sony, made that bag even lighter.”
One of the main advantages Cecil has found in shooting mirrorless is a tool available on those cameras called focus peaking. “I can’t see anything in the viewfinder to see if an image is in focus or not,” he says. “But once you enable focus peaking in the camera while you’re in manual focus, it highlights different parts of the image to show you what’s in focus and what isn’t.”
Read on for info on some of the photos Cecil recently captured with his mirrorless camera and Tamron lens arsenal, including the 17-28mm F/2.8 Di III RXD, 35-150mm Di VC OSD, 100-400mm Di VC USD, 28-75mm F/2.8 Di III RXD, and SP 15-30mm F/2.8 VC G2 lenses.

17-28mm (22mm), F/16, 1.6 sec., ISO 50
Click image to view larger
This first photo was part of the Sacred Dancing Cascade in Glacier National Park. I’d brought along my Sony body with the 17-28mm and the 28-75mm, as well as my Nikon body for the 17-35mm and 35-150mm. I used the 17-28mm because I was practically right on top of the waterfall and wanted a wider view. I used a slightly longer exposure here to blur the water for that creamy effect.

35-150mm (90mm), F/11, 1.0 sec., ISO 100
Click image to view larger
St. Mary Falls, also in Glacier, falls about 35 feet in three separate tiers. The two biggest ones make for great photos. You can’t really get too close to this waterfall—I was shooting with my Nikon here from about 60 yards away, which is why I went with a somewhat longer lens here than the one I used for the previous shot. That color you see in the upper left was pretty much the only color in the area, so I wanted to make sure I included it in the shot. The final image you see is actually two photos that I stitched together afterward.
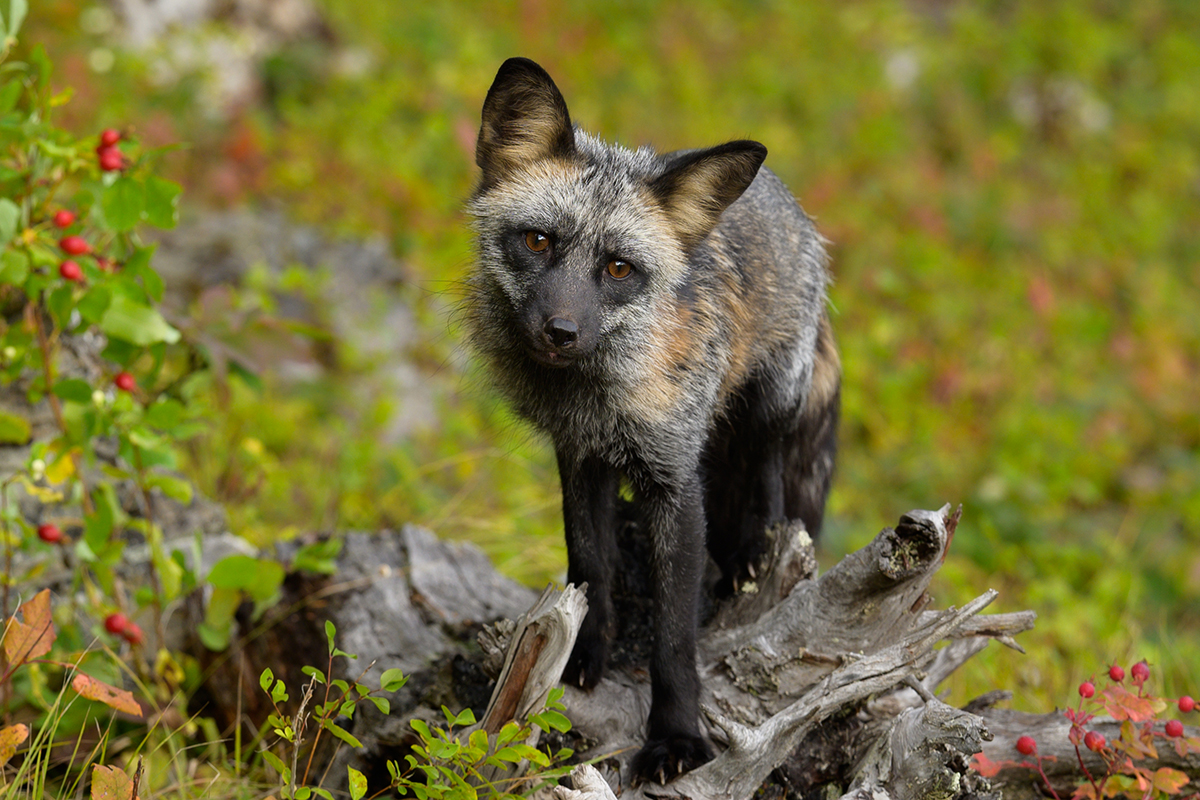
100-400mm (270mm), F/8, 1/500th sec., ISO 1000
Click image to view larger
Not far from Glacier National Park is the Triple “D” Ranch, where I shot this series of wildlife photos. You’re allowed into these enclosures with the animals so you can photograph them as if they’re in their natural habitats. They have handlers in there to help guide the animals so you can see them better. The image here is of a cross fox, a variety of red fox. I took its photo with the 100-400, because I was quite close. With a minimum object distance of 59 inches and maximum image magnification of 1:3.6, I was able to zoom in and achieve that nice blurred background, with the depth-of-field falling off quickly.
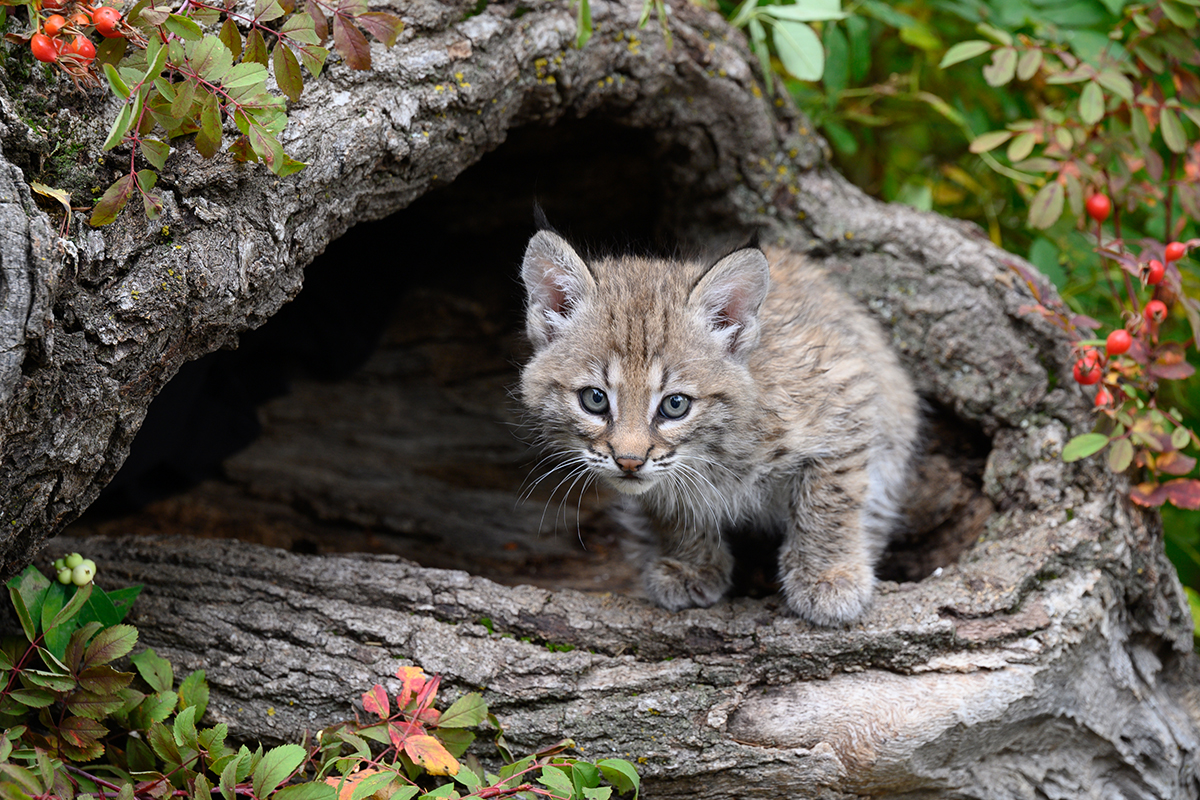
35-150mm (130mm), F/6.3, 1/125th sec., ISO 640
Click image to view larger
This shot of a bobcat kitten, which was no larger than a regular domesticated kitten, was another type of “cheat.” The game farm workers had set up this log, with all of these berries placed around it. The workers placed the kitten up there, and it didn’t even try to jump down or otherwise move. I was about 5 feet away, so I went with the 35-150mm lens because of how close I was. Plus, it was a bit dark in that area, so I wanted a lens that would allow me to open up a little more if I needed to.
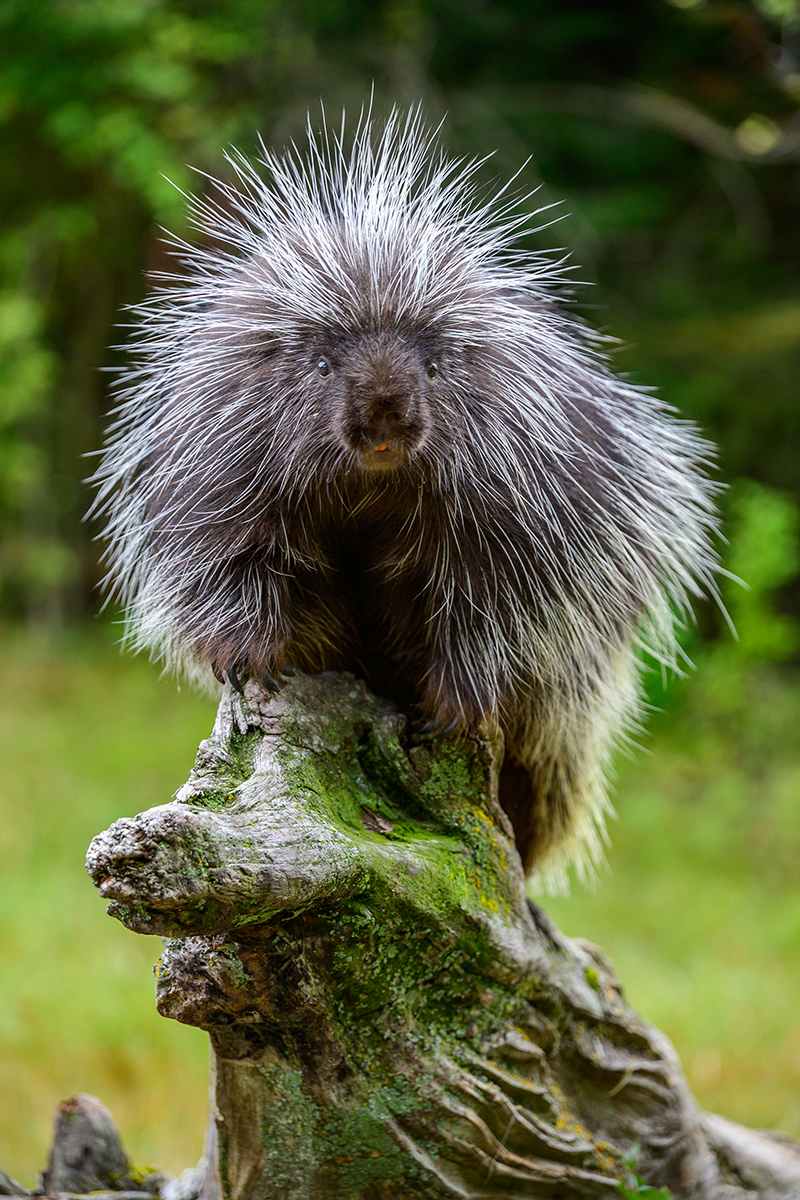
35-150mm (270mm), F/4, 1/250th sec., ISO 2000
Click image to view larger
This was also taken at the game farm. I don’t know that you’d ever be able to get a shot like this out in the wild. They had two different porcupines, and workers were tempting them with treats. This one climbed up on that perch and looked right into the camera. I was about 4 or 5 feet away. The optical quality of that 35-150mm lens allows you to see every detail of its hairs, which really pop out against that soft background.
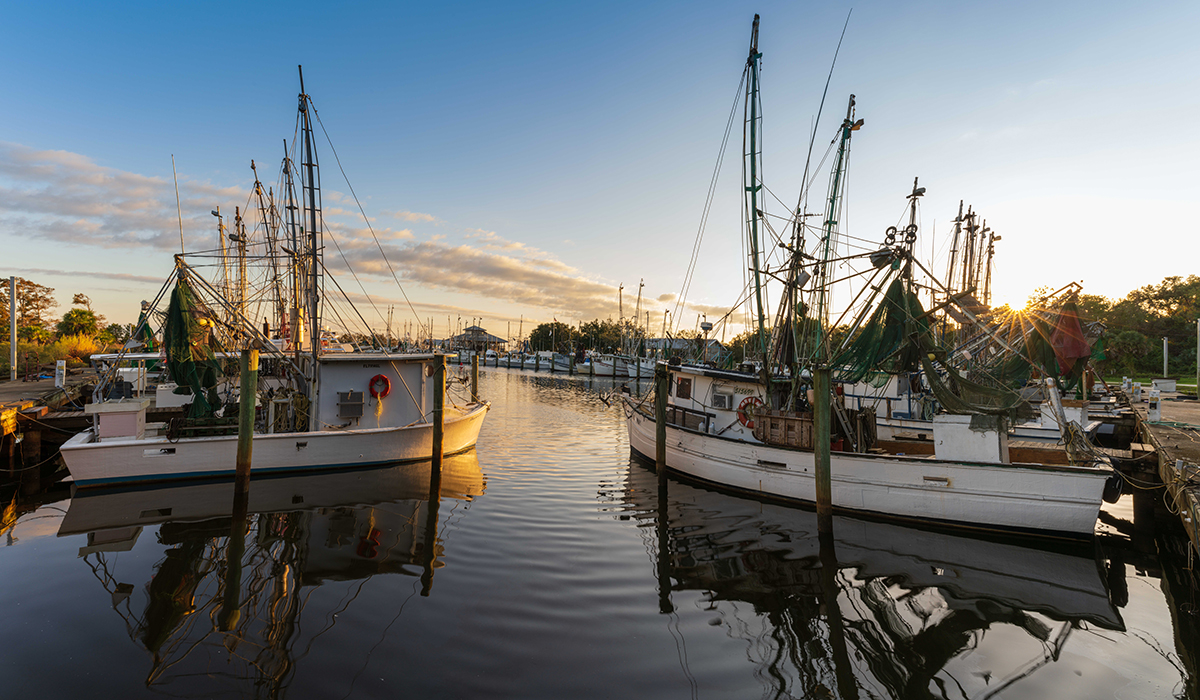
28-75mm (28mm), F/16, 1/13th sec., ISO 50
Click image to view larger
There’s a marina in Apalachicola called the Scipio Creek Marina, where we take a lot of people when we do our workshops in that part of Florida. There’s a ton to shoot there, from the wide variety of birds that hang out around the boats, to the details of the boats themselves, like the shrimp nets. I took this shot about 20 minutes after sunrise with the 28-75, but it wasn’t quite wide enough to get the sun star on the right side of the frame. I was about 200 yards from my car, so I couldn’t run back and switch lenses. Instead, I captured a panoramic and stitched everything together later. This is one of my favorite images from that trip—I love how the boats guide your eyes into the center of the photo.
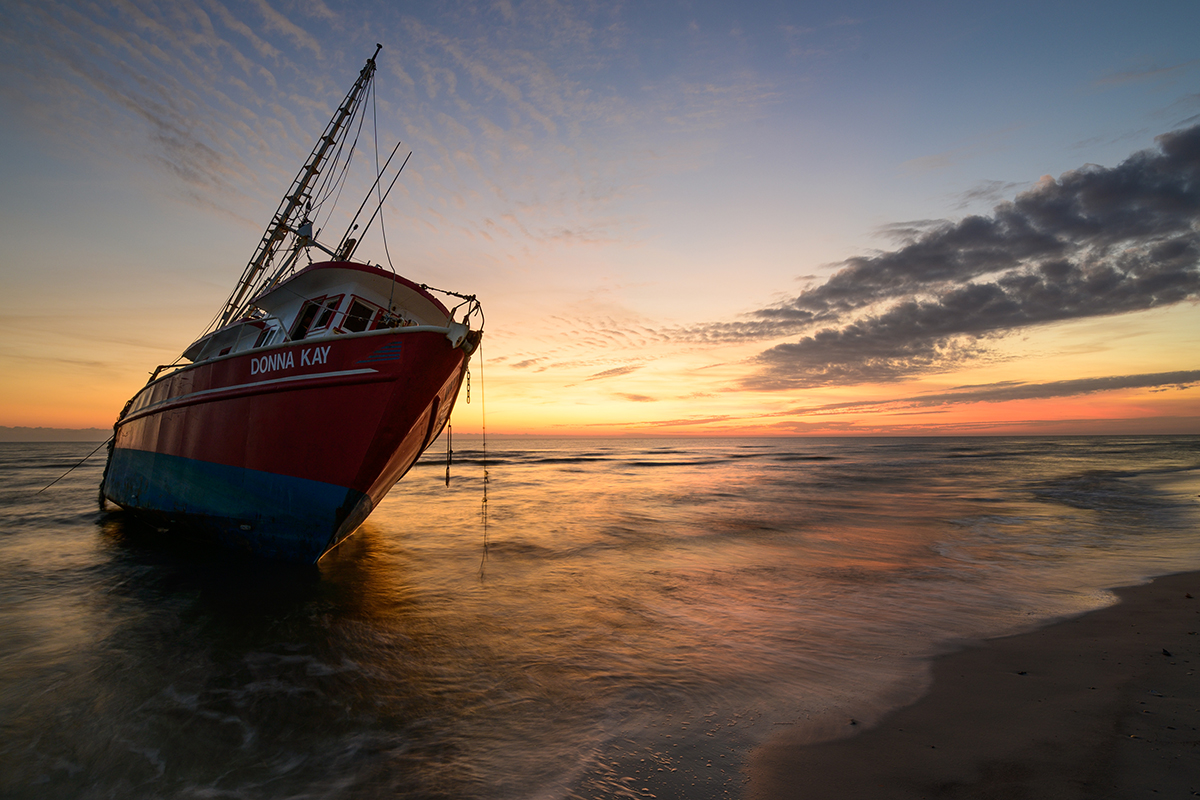
15-30mm (17mm), F/8, 1.3 sec., ISO 100
Click image to view larger
In 2018, the Donna Kay shrimp boat ran aground in Cape San Blas, Florida. The story has it that the captain fell asleep and the boat got beached. It’s sunken into the sand even more now and is apparently too difficult to remove, so it’s become something of a tourist attraction, though you have to walk a ways down the beach to get to it. It’s also a terrific photo opportunity, and I’ve heard people flock there to photograph the Donna Kay under the stars. I took this photo at sunset, using the wide-angle 15-30mm to get as much of the scene as I could.
To see more of Cecil Holmes’ work, go to www.cecilsphotos.com.
More Photo Tips | Watch Videos | Learn More About Tamron Lenses | Photo Gallery