The Adrenaline Rush of Astrophotography
Chris Slagle shares his fascination of the night sky with his Tamron 28-75mm F/2.8 G2 and 17-28mm F/2.8 zoom lenses.
Share the article:
More Photo Tips | Video Gallery | Photo Gallery | Enewsletter sign-up
By Jenn Gidman
Images by Chris Slagle
On his Instagram page, Chris Slagle describes himself as a “serial adrenaline seeker with a camera.” “I was one of those kids who had to try every extreme sport,” the New Jersey native says. “And so from a young age, my friends and I were filming ourselves and messing around with videography and editing programs, just for fun.”
When Chris moved out to Southern California a couple of years ago, he was wowed by the landscapes and decided to start trying his hand at still photography as well. “I would be on Instagram and see many of the locations I was exploring in my new home being captured by astrophotographers, and that caught my attention,” he says. “Back on the East Coast, thanks to all the light pollution, I couldn’t even see the Milky Way. Out here, photographers were making magic out of it.”
Chris immersed himself in the genre, and going forward—thanks to his history with extreme sports and ability to reach remote locations on mountaintops and in the backcountry—he plans to capture astrophotography photos in locations that not many others can get to. “I found I was seeing the same locations over and over again on social media,” he says. “I’ve tried to differentiate myself by concentrating not only on the skies, but also on the foregrounds, using creative techniques like lightpainting and silhouettes. I’ll get very artistic sometimes, taking an almost fantasy-like approach.”

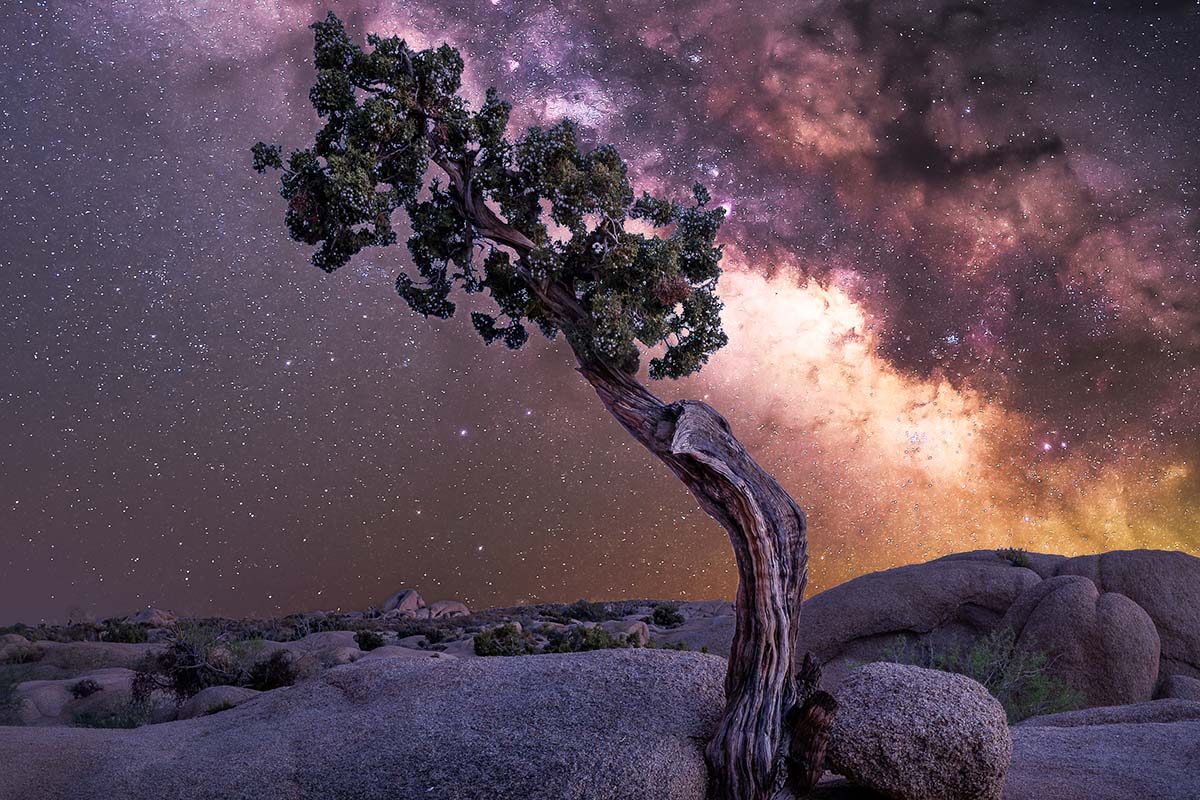
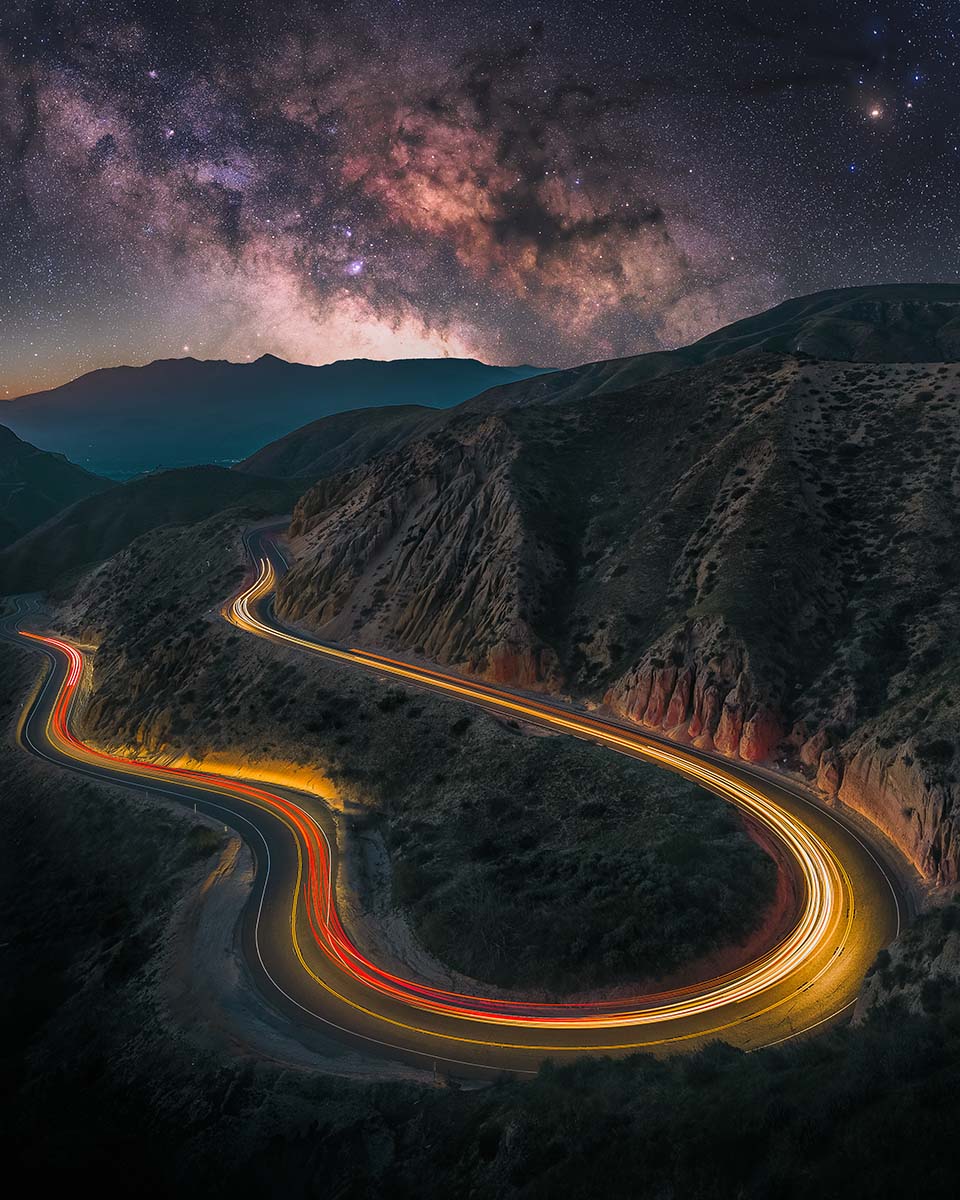
17-28mm (22mm), F/14, 1/4 sec., ISO 100
SKY: 28-75mm (50mm), F/2.8, 180 sec., ISO 800
Click image to view larger
To create his night sky photos, which are often composites of sky and foreground, Chris uses the Tamron 28-75mm F/2.8 G2 and 17-28mm F/2.8 Di III RXD zoom lenses. “The very first lens I got was the 28-75,” he says. “That lens can do it all and is always in my bag, whether it’s for shooting a narrower, more zoomed-in section of the sky or taking a foreground shot.”
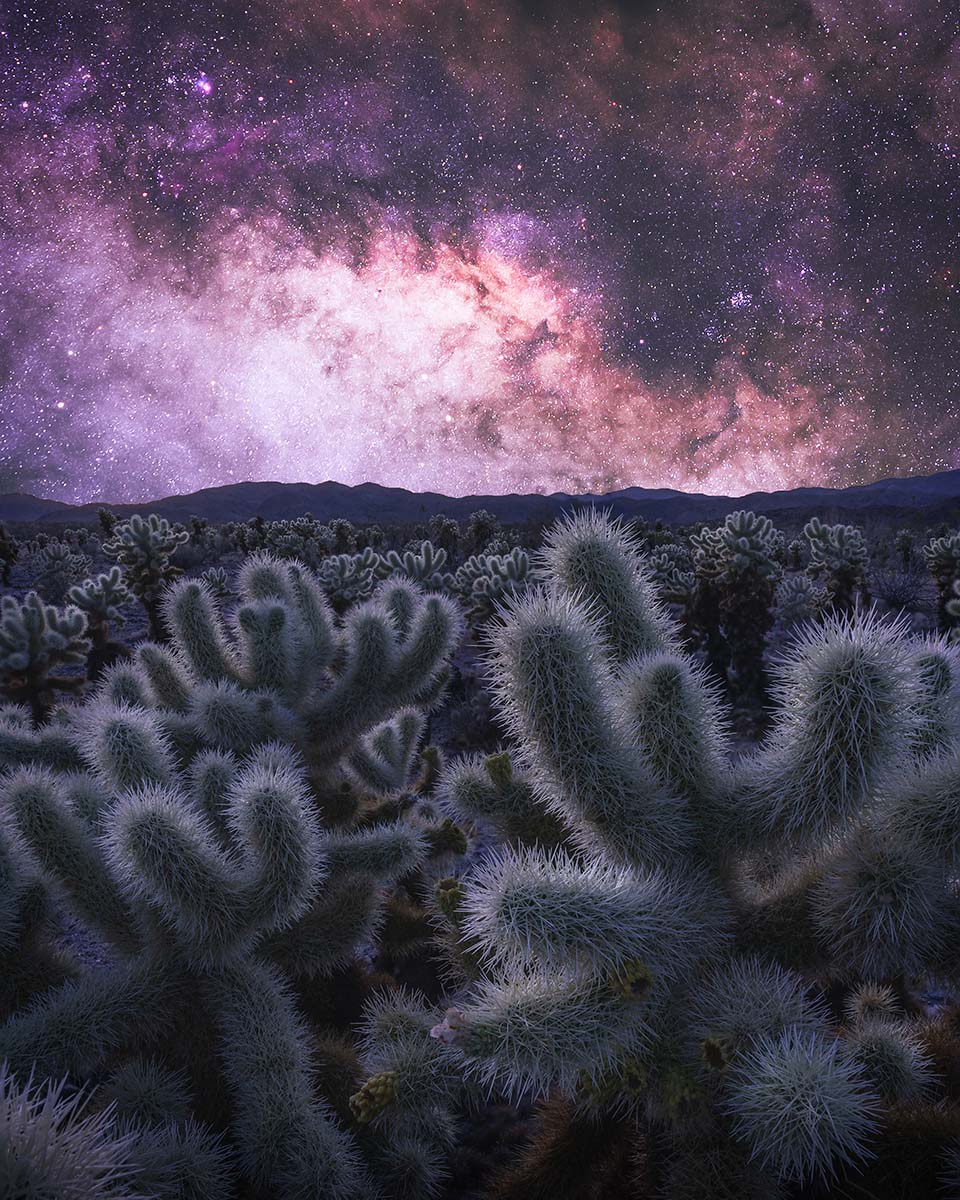
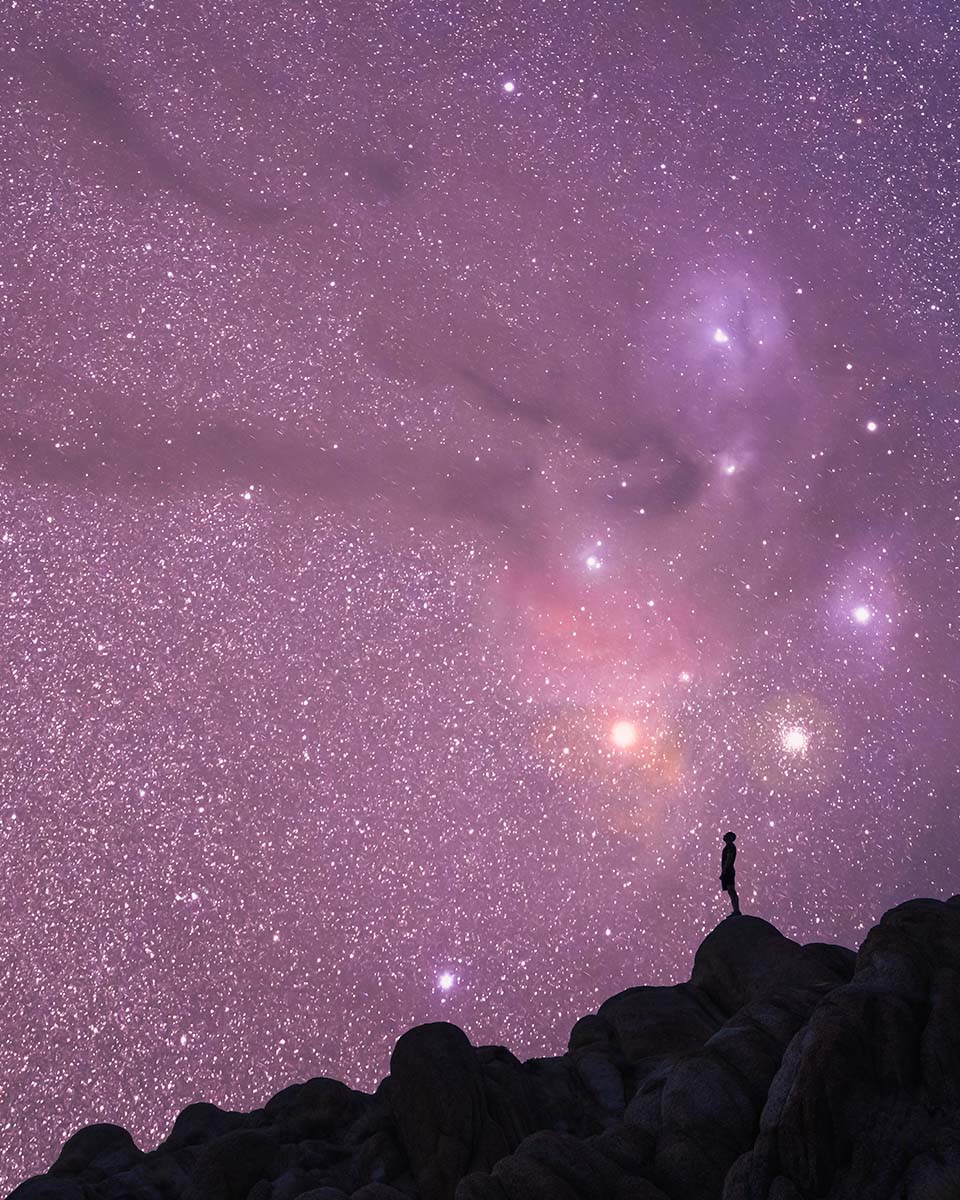
17-28mm (20mm), F/11, 1/8 sec., ISO 100
SKY: 28-75mm (75mm), F/2.8, 180 sec., ISO 800
Click image to view larger
When the 17-28mm debuted, Chris’ experience with the 28-75, and his subsequent upgrade to the 28-75mm G2 version, drove his decision to make that purchase as well. “The extra reach on the wide end allows me to capture more of the Milky Way in a single shot,” he says. “I can then zoom in to 50mm or 75mm and focus on more of the details in the galactic core.”
Using the 17-28 for foreground shots for his composites helps Chris create depth. “For instance, when I was taking photos up at Mono County’s Convict Lake, there was a beautiful mountain range in the distance, then the lake, and then these ice blocks that were only a few feet from where I was shooting. I needed a lens that could capture all of that in one scene, and the 17-28 delivered.”
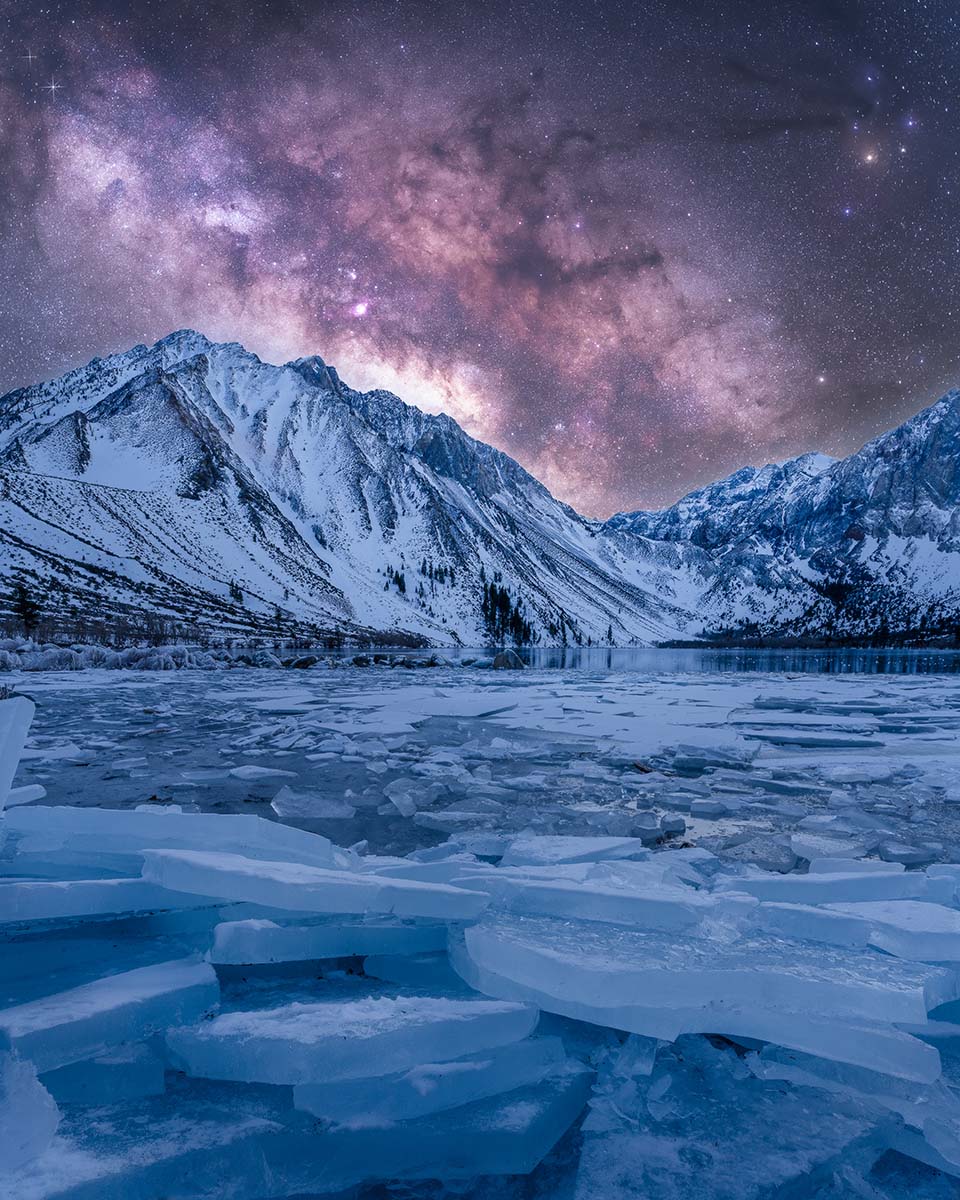
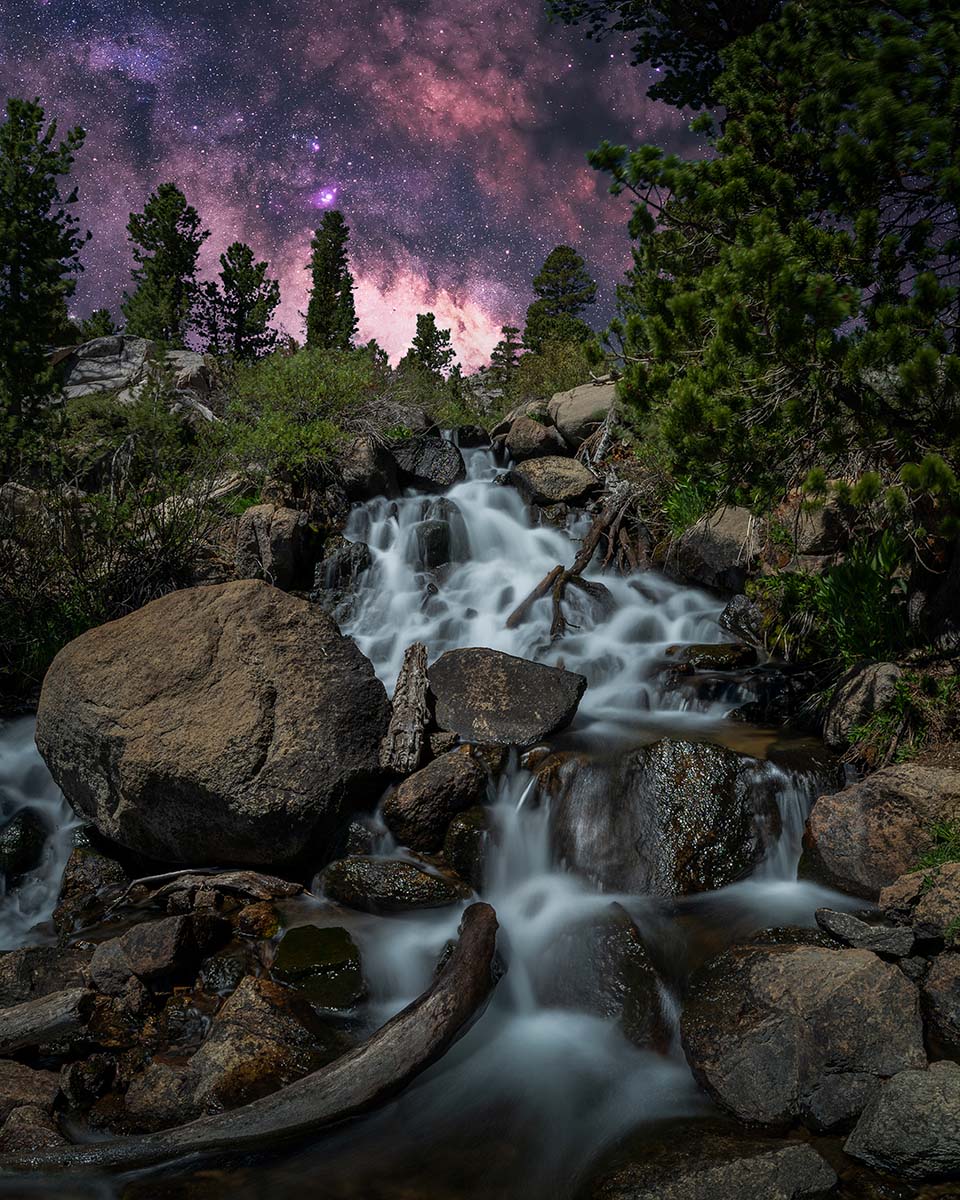
17-28mm (17mm), F/11, 1/3 sec., ISO 100
SKY: 28-75mm (50mm), F/2.8, 300 sec., ISO 800
Click image to view larger
With the addition of that second lens, Chris felt he obtained the final piece of his astrophotography kit. “Having a range of 17mm all the way up to 75mm is ideal for the work I do,” he says. “Plus, both lenses have a maximum F/2.8 aperture, which allows me to do multiple-minute exposures and collect a lot of light. My stars always come out sharp.”
In addition to his camera, lenses, and tripod, Chris uses a filter to help reduce light pollution and a star tracker. “Ever since I was introduced to that latter piece of technology, every one of my shots is tracked,” he says. “I also use a remote trigger. Whether you want to do a one-minute exposure time or longer, that remote trigger is essential.”
Before he heads out, Chris does some prep work so he knows what he’s shooting and when. “You’ll want to check a weather app to ensure cloud cover will be minimal—there has to be less than a 20% chance of cloud cover if I’m going to make the effort to shoot, since clear skies are critical,” he says. “You can also check sites like www.darksitefinder.com to ensure you’re not shooting in a place with too much light pollution. I’ll also use the Stellarium app to get a general sense of when and from which direction the Milky Way is rising. Finally, I’ll use the SA Console app, which helps polar-align my star tracker with the North Star.”
Another critical piece of the astrophotography puzzle for Chris is shooting the night skies during a new moon, or as close to the new moon as possible. “I’ll check ahead of time and mark it on my calendar,” he says. “The opposite of that, a full moon, is awesome to see, and you can take some interesting pictures with it there, but in terms of shooting the Milky Way, it can be more difficult during a full moon—it’s like having a giant nightlight turned on in the sky.”
17-28mm (18mm), F/9, 13 sec., ISO 100
SKY: 17-28mm (28mm), F/2.8, 300 sec., ISO 400
Click image to view larger
Knowing what to focus on when you’re staring up into the seemingly infinite cosmos can seem overwhelming, but Chris offers some tips to help you get your sky legs. “Focus on learning how to photograph the sky first,” he says. “If you start introducing complicated foregrounds into your shots before you really master capturing the sky, then you might not be getting the best photos.”
To nail that sky, you have to first ensure you’re using a stable tripod and not setting up in a windy location. “Capturing sharp stars is key to a great image, and many people struggle with that initially,” Chris says. “After you’ve set your camera up on your tripod, turn the brightness up on your LCD screen so you can see what you’re doing. Make sure you’re shooting in manual, and that your aperture is as wide open as possible—i.e., F/2.8 is ideal to shoot at.”
17-28mm (21mm), F/8, 15 sec., ISO 100
SKY: 17-28mm (24mm), F/2.8, 300 sec., ISO 800
Click image to view larger
For focusing, Chris recommends pointing your camera at the brightest star you can see. “Then use your manual focus to focus on that star,” he says. “Use a very gentle touch on the focus ring. On my Sony camera—and there should be a similar feature on other cameras—I use a feature called ‘focus peaking,’ which highlights in red the peak contrast areas of the object I’m focusing on.”
17-28mm (20 mm), F/11, 15 sec., ISO 100
SKY: 28-75mm (50mm), F/2.8, 180 sec., ISO 800
Click image to view larger
If available on your camera, you can also set up a quick shortcut button, which allows you to zoom in even further than usual. “If you use manual focus and start to turn your focusing ring, you can typically zoom in to five or six times magnification,” Chris says. “But if you have that quick shortcut button, you can set it up to do something like 10 times magnification, which gives you the best chance of achieving sharp focus.”
In terms of exposure times, Chris advises beginning astrophotographers start with the “500 rule”—meaning your shutter speed should equal 500 divided by whatever focal length you’re using. For example, if you’re using a focal length of 20mm, your shutter speed should be 25 seconds (500/20 = 25). “If you use a star tracker, then you can start going wild with one-minute, two-minute, three-minute exposures,” he says.
The editing process is where Chris adds the final touches onto his artistic astrophotography creations. “I aim for at least 30 minutes of exposure time across all the images I’ve shot in an evening,” he says. “Then what I do is use a free software program called Sequator, which allows you to stack Milky Way photos or other kinds of astrophotography images. You can use an app on the Mac called Starry Landscape Stacker that does pretty much the same thing. Either one helps remove the noise and offers you the best raw image to edit.”
After Chris has done that, he’ll make some basic edits in Lightroom, then head into Photoshop. “That’s where I fine-tune the details, usually in terms of creating contrast within the sky,” he says. “And there are different ways to create contrast in the sky—it’s not just, ‘Well, I want to have a very bright Milky Way core, and then everything outside of that should be darker.’ That’s important, but you can also, say, further darken the dust clouds that the Milky Way has, even more than the darkened sky, to give the sky some more character. You can make people say, ‘Hey, wait a sec. There’s other stuff going on in this picture!’”
17-28mm (17mm), F/13, 4 sec., ISO 100
SKY: 28-75mm (75mm), F/2.8, 180 sec., ISO 800
Click image to view larger
To see more of Chris Slagle’s work, check out his website and Instagram.
More Photo Tips | Watch Videos | Learn More About Tamron Lenses | Photo Gallery