Prepare to Photograph the Next Solar Eclipse
Elevate your eclipse photography with TAMRON lenses, where clarity meets creativity.
Share the article:
More Photo Tips | Video Gallery | Photo Gallery | Enewsletter sign-up
Images & Tips by Photographers listed
While the next total solar eclipse will not occur in the USA until August 23, 2044, there are solar eclipses, many of them total, happening with frequency worldwide over the next 6 years. Whether you're a seasoned astrophotographer or a passionate stargazer, our tips ensure you will immortalize every moment with precision. Mark your calendars and join us under the sky's grand stage at these upcoming solar eclipses around the globe, according to NASA:
Solar Eclispe:
Oct. 2, 2024: Annular
Geographic Region of Visibility - An annular solar eclipse will be visible in South America, and a partial eclipse will be visible in South America, Antarctica, Pacific Ocean, Atlantic Ocean, North America
March 29, 2025: Partial
Geographic Region of Visibility - Europe, Asia, Africa, North America, South America, Atlantic Ocean, Arctic Ocean
Sept. 21, 2025: Partial
Geographic Region of Visibility - Australia, Antarctica, Pacific Ocean, Atlantic Ocean
Feb. 17, 2026: Annular
Geographic Region of Visibility - An annular solar eclipse will be visible in Antarctica, and a partial eclipse will be visible in Antarctica, Africa, South America, Pacific Ocean, Atlantic Ocean, and Indian Ocean
Aug. 12, 2026: Total
Geographic Region of Visibility - A total solar eclipse will be visible in Greenland, Iceland, Spain, Russia, and a small area of Portugal, while a partial eclipse will be visible in Europe, Africa, North America, the Atlantic Ocean, Arctic Ocean, and Pacific Ocean
The date listed above for each eclipse is the local date where the eclipse occurs.
Lunar Eclipses
March 25, 2024: Penumbral
Geographic Region of Visibility - Americas
Sept. 18, 2024: Partial
Geographic Region of Visibility - Americas, Europe, Africa
March 14, 2025: Total
Geographic Region of Visibility - Pacific, Americas, Western Europe, Western Africa
To help you get ready, we’ve asked 7 pro photographers about their experience capturing the April 8th Total Solar Eclipse. Follow their top tips for successful eclipse photography.
Steven Steele
“I drove 11 hours round trip, from Ottawa Kansas to Mountain Home Arkansas, to reach an area of totality. Having never seen a total eclipse before, I wasn't exactly sure what to expect. I can't describe or put into words what I felt, or witnessed. I feel like only people that have seen it, in person, can understand its true magnificence! It's a moment I will never forget.”
© Steven Steele
Click image to view larger
--------------------------------
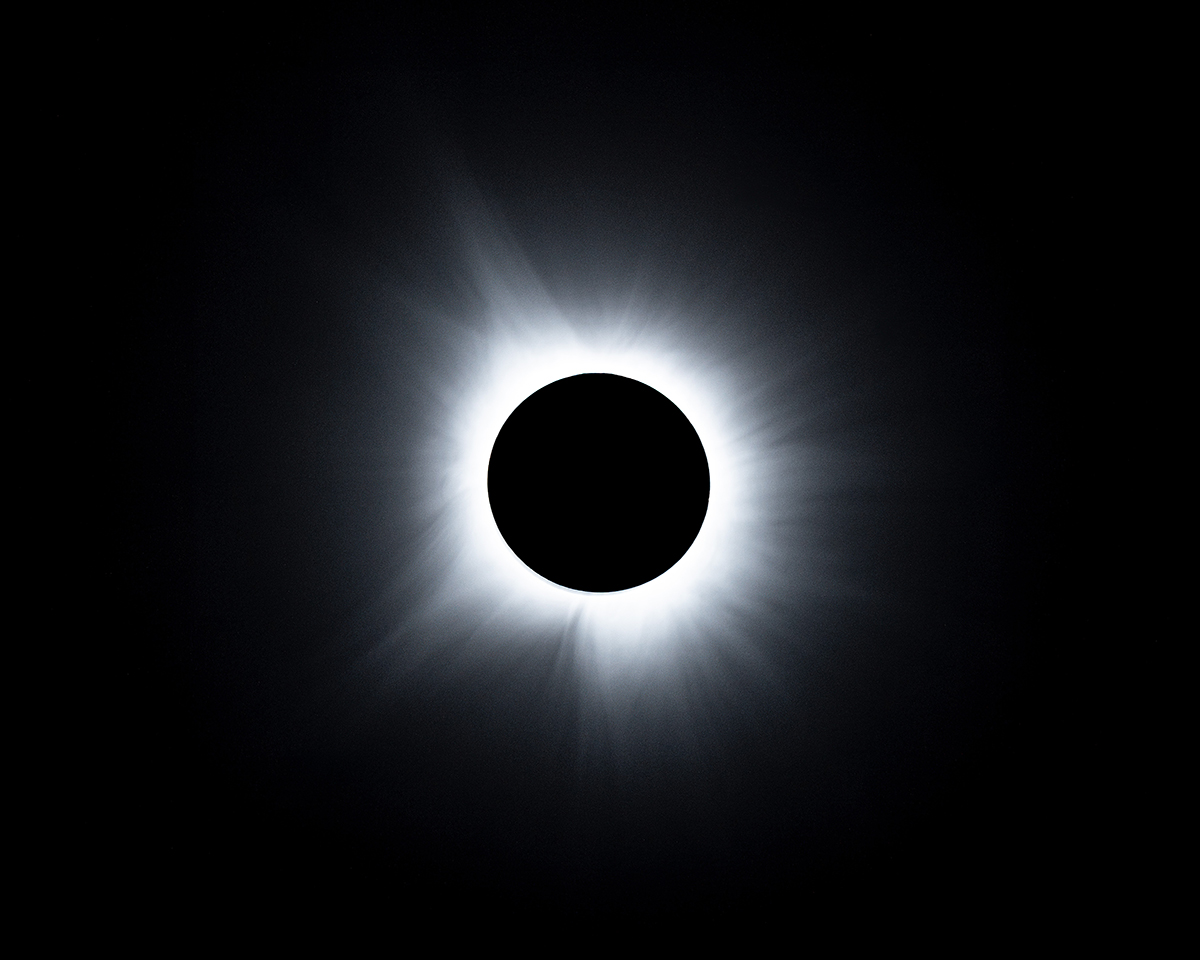
Nick Irwin
"Get out and shoot. Even though I didn't get the chance to travel to totality, after photographing the max 94% in my driveway in Rockford, MI, I realized that each person who watched the sun during the eclipse came away with a different story, picture, perspective, and memory. Perhaps realizing this is what makes celestial events so amazing. In one way or another, they always make us feel small.”
© Nick Irwin
TAMRON 150-500 (480mm), F6.3, 1/640th sec., ISO 100, 16 stops filter
Click image to view larger
------------------------------------
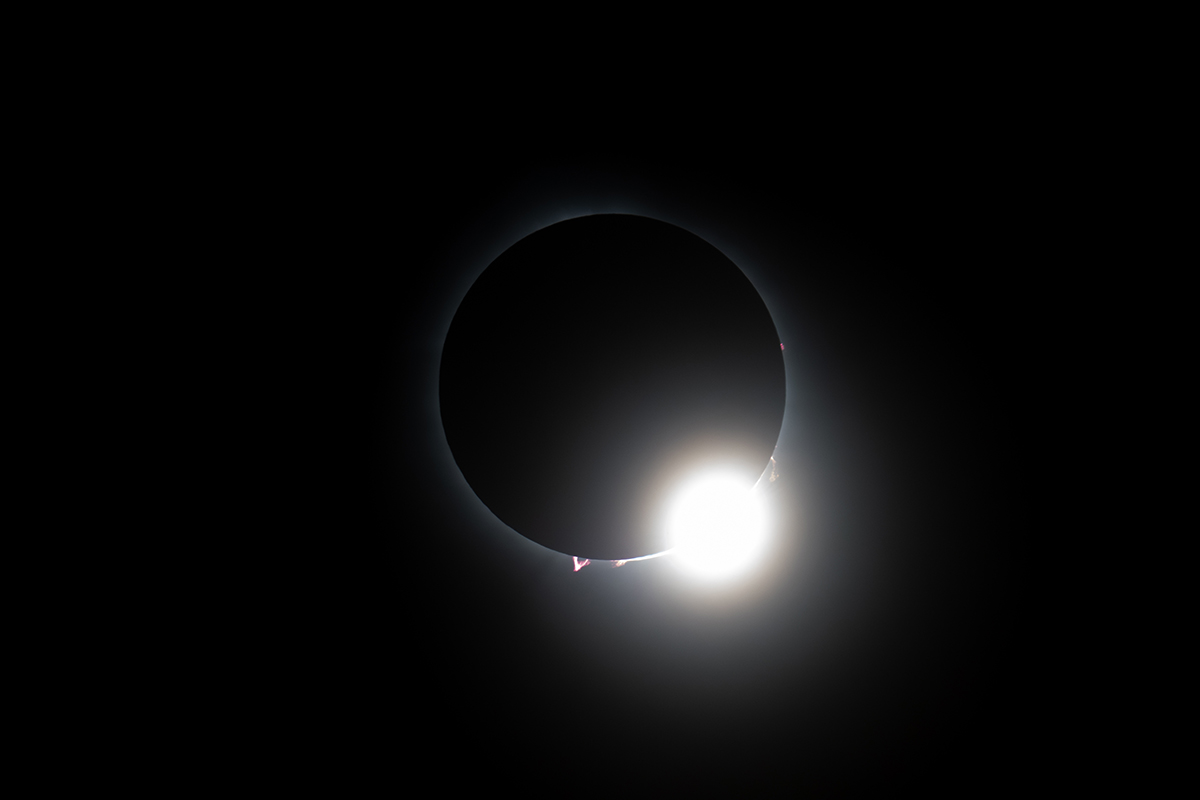
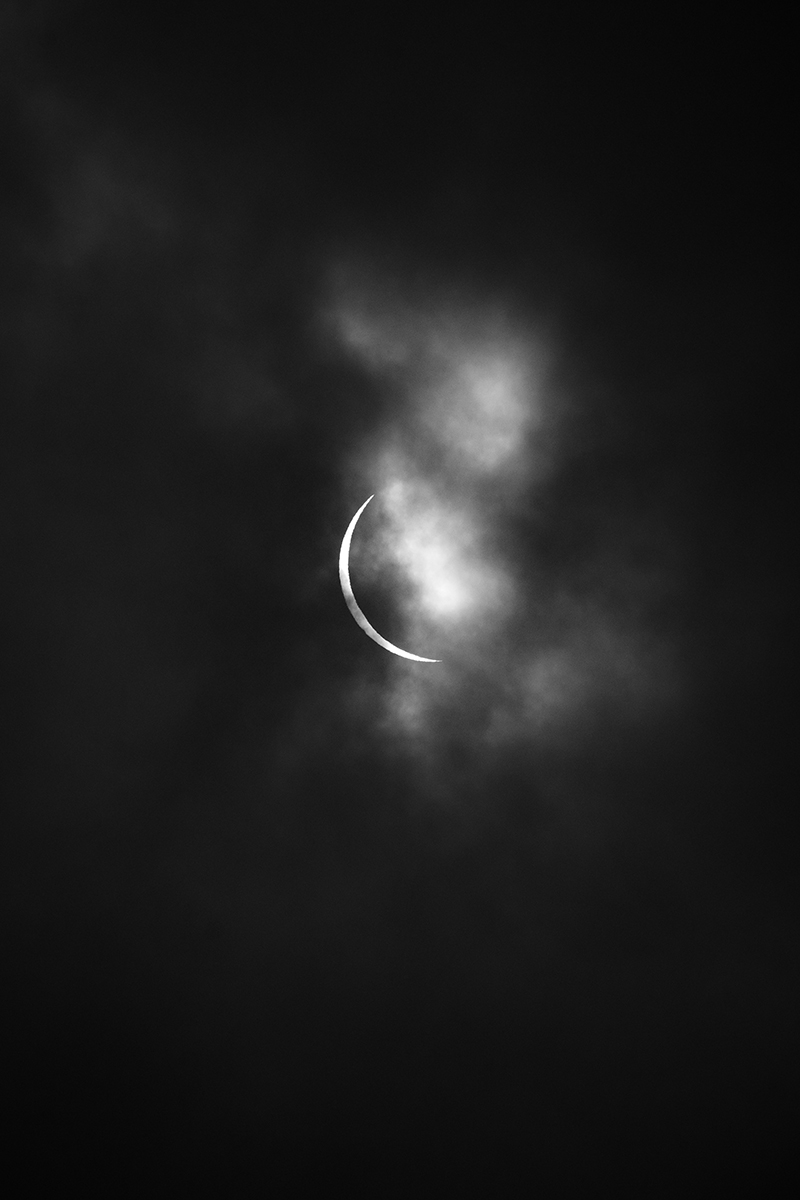
Bhaumik Bheda
“With over a year of planning behind me, I was determined to capture this celestial spectacle from Austin, Texas. Despite ominous weather forecasts, I remained steadfast in my resolve, armed with my trusted Tamron 70-300mm and the unwavering belief that I would witness the eclipse in all its glory. On the day of the eclipse, as heavy clouds threatened to obscure the sky, I felt a twinge of anxiety. Yet, just moments before totality, the clouds miraculously receded, revealing the sun in all its splendor. With a steady hand and a racing heart, I aimed my camera towards the heavens, capturing the breathtaking beauty of the eclipse. In that fleeting moment of totality, as darkness descended and the corona blazed in the sky, I stood in awe of the majesty of the universe, grateful for the opportunity to witness such a rare and wondrous event.”
© Bhaumik Bheda
Click image to view larger
Technical Tips for Photographing the Eclipse:
1. Always use a solar filter from a renowned and certified brand. Spend a little extra to protect your expensive camera sensor from frying.
2. I Highly recommend using a tripod and a remote shutter release for crisp, non-blurry shots. At higher focal lengths, like 300mm, even a small motion can be noticed in the images.
3. Use Manual Focus – before the Eclipse begins, switch to Manual Focus and adjust until the edge of the sun is sharp. This is very helpful, especially at Totality, when the sun is hidden behind the moon and there is very little light available for the sensor to focus.
3. Only remove the solar filter at totality, this will allow it to capture the Baily's Beads, Diamond Ring Effect, and Totality in its true beauty.
4. Remember to place the solar filter back as the moon reveals the sun, at the end of totality.
---------------------------------------
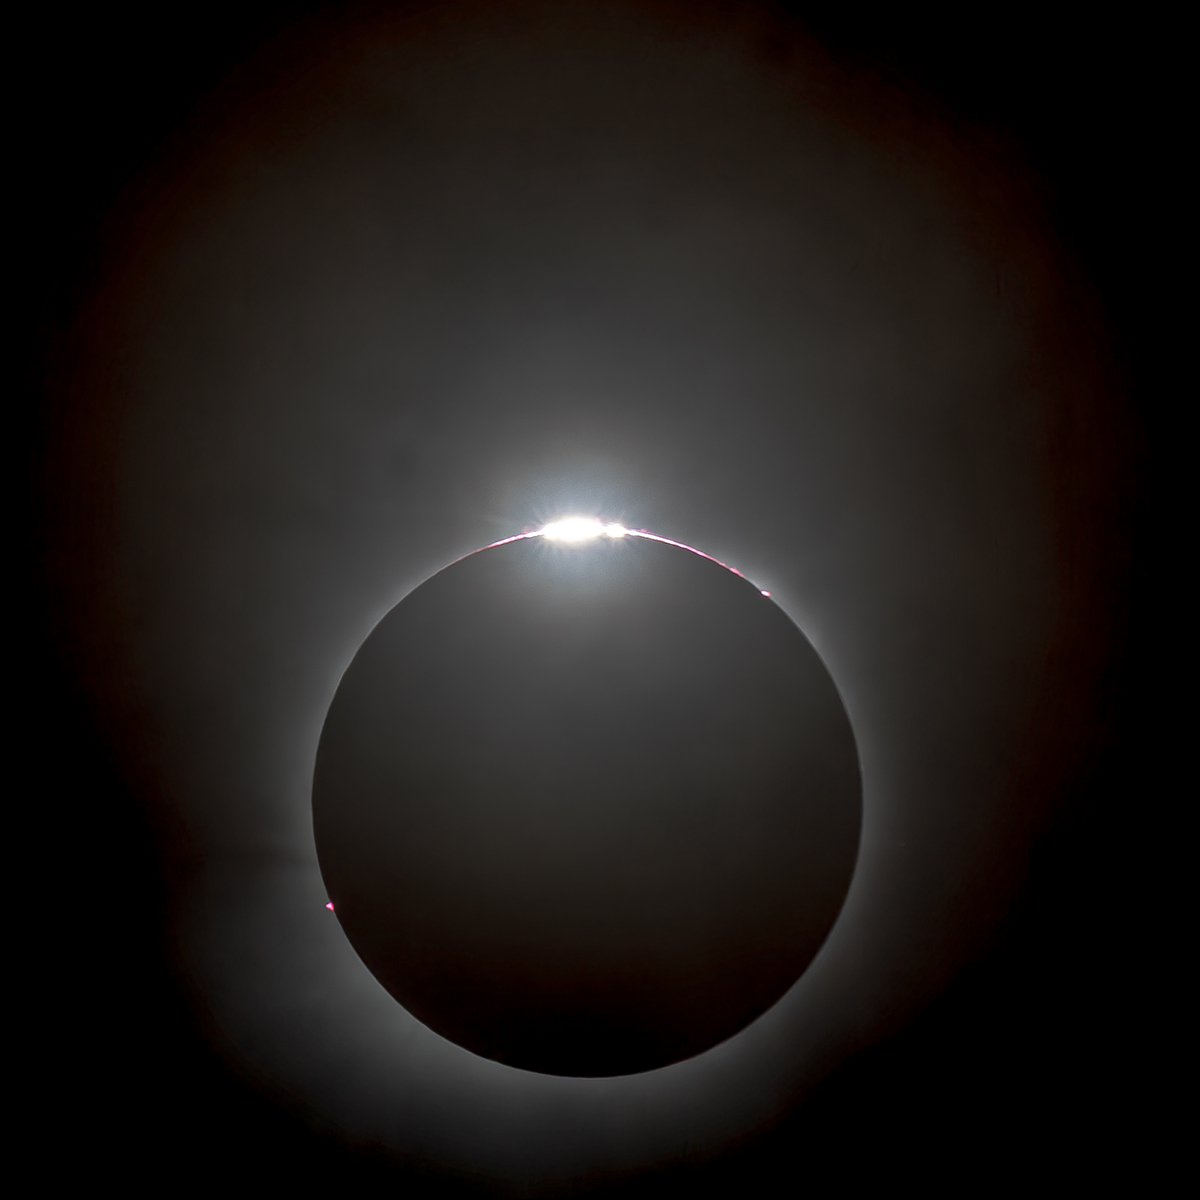
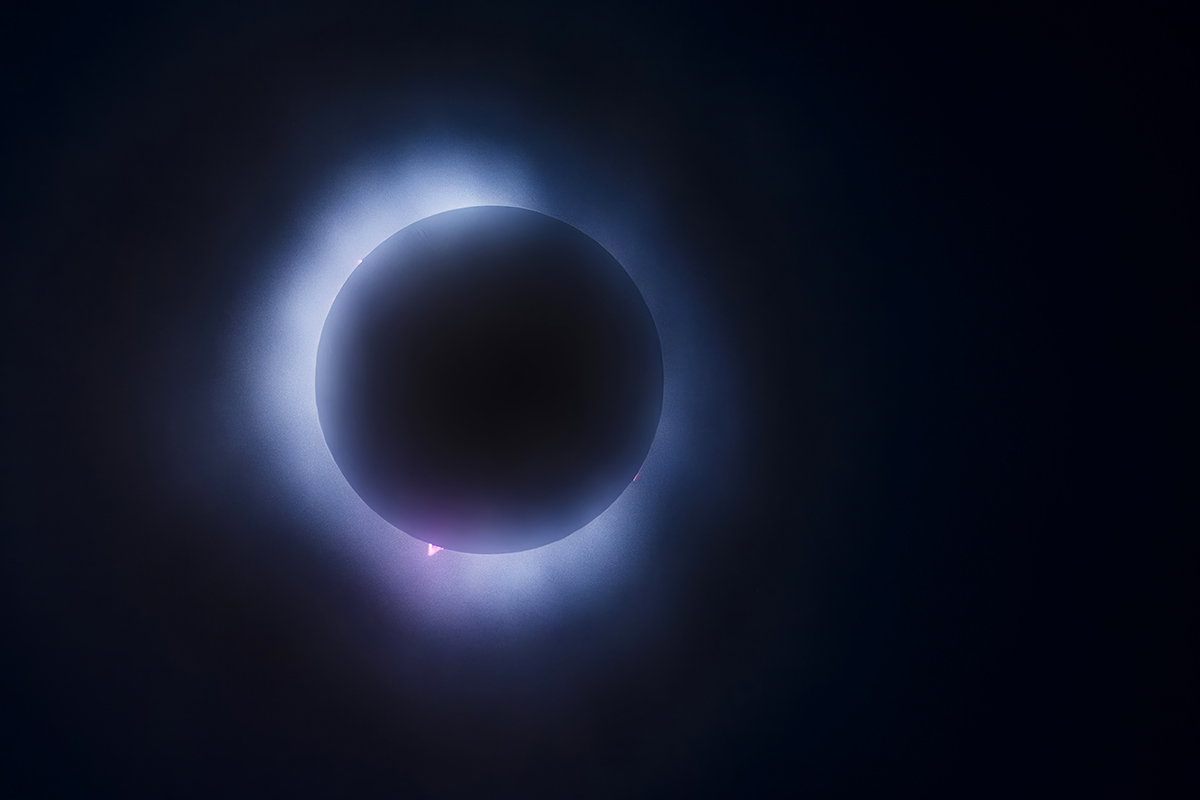
David Akoubian
"After missing out on totality in 2017, I made it my personal mission to capture this eclipse and especially the Diamond Ring, which occurs just before totality. We used an App that would give us a time schedule to work with that even had verbal notifications. At about 90 seconds or a minute prior to totality, I removed the Solar Filter, made the adjustments to the exposure, and waited. The App was helpful to give us a 10 second warning, which is when the Diamond Ring happens. I pointed my camera towards the Sun, checked the AF, and fired away. I love how sharp the lens made all the details in the image! I was able to capture images that will give me a lifetime of memories."
© David Akoubian
Tamron 150-500mm (500mm), f/8, 1/2000 sec.
Click image to view larger
---------------------------------------------
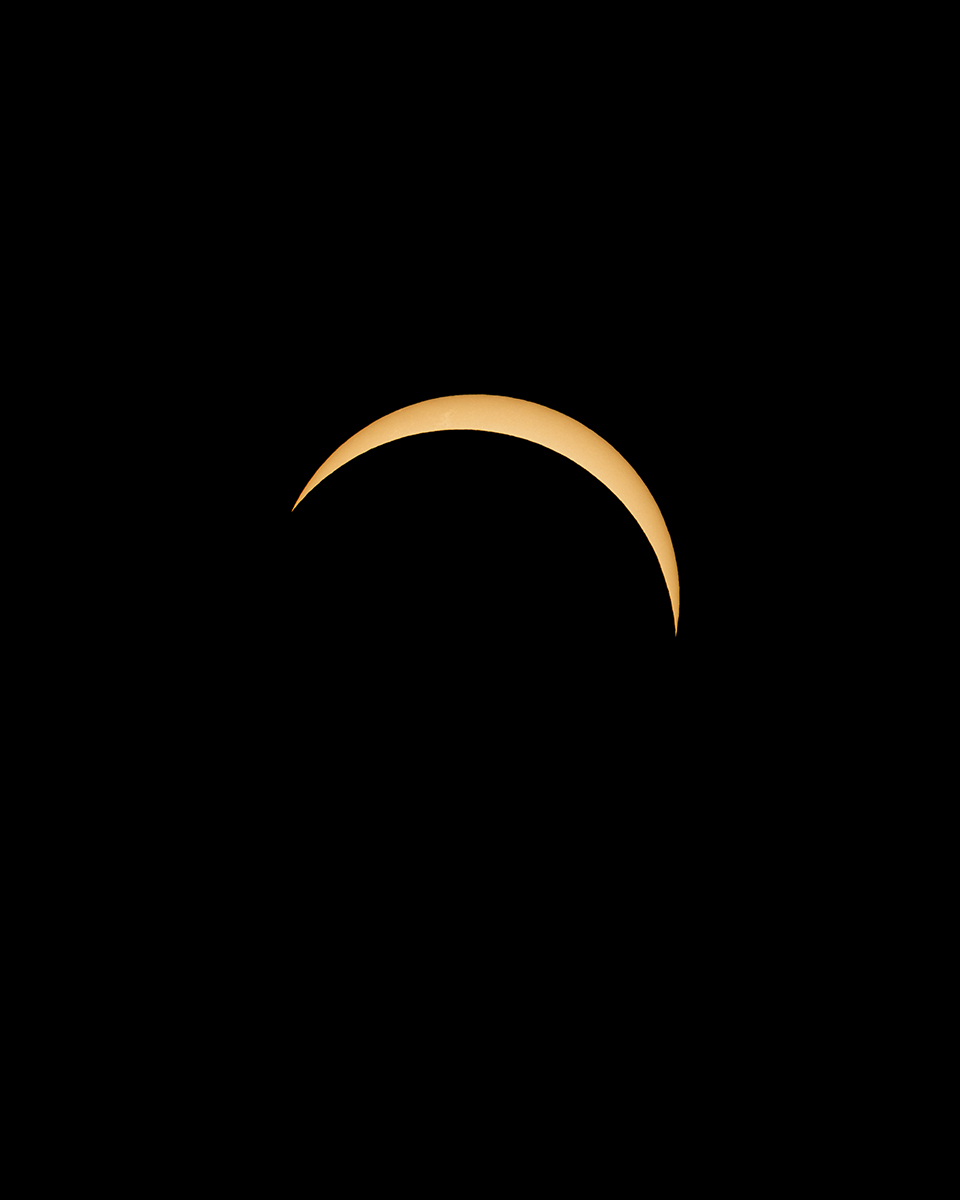
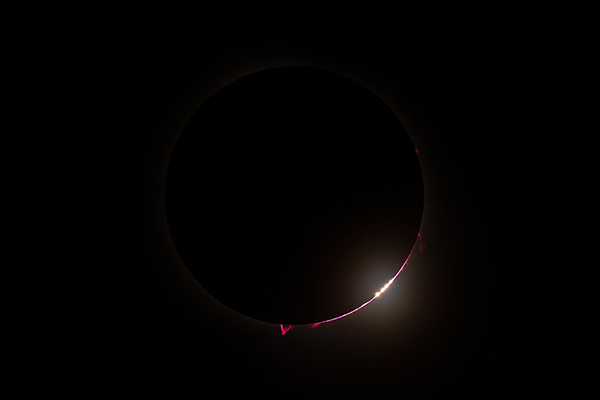
Tony Shepherd
“I took this photo in Downtown Nashville, TN. The gear used in this shot was the Sony A7RIV along with the Tamron 50-400mm. On the front of my lens originally was a custom solar ND filter, featuring a sheet of mylar and two layers of ND (15 stops in total, with the front on variable). The variable ND filter was on the front made it easy to compensate for fluctuations in light/visibility because in Nashville we had heavy cloud coverage. Ultimately, I didn't need any ND filter because the cloud coverage was so heavy that nature provided enough natural ND.”
© Tony Shepherd
TAMRON 50-400mm (400mm), F8, 1/1000th sec., ISO 800
Click image to view larger
A few tips for capturing a solar eclipse, especially on a cloudy day:
1. If your camera offers a burst mode, shoot in burst mode to capture multiple frames. I shot over 250 shots to get one that I liked.
2. Shoot with a quality lens that offers a wide range. The Tamron 50-400mm is perfect for that! I was able to experiment with wider shots as well as close ups.
3. Have ND filters on hand for moments where the clouds break. From time to time, I had to grab an ND. On a clear day, the situation is more predictable. On a cloudy day, you have to be flexible.
4. Shoot from a tripod...but don't be afraid to grab the camera and shoot off-hand. You get stability on a tripod, but you may get more creative angles off hand.
-------------------------------
Kurt Gardner
"I planned for over a year for this past eclipse to select the ideal location in the Adirondacks, considering backcountry warnings and response times. With PhotoPills, I prepared for a total eclipse by shooting the sun with solar filters to plan lens choices and tripod placement.
I practiced my shooting skills by envisioning scenarios with the filter both before and after totality, making sure to take it off during the full eclipse. I prepared two cameras and two TAMRON lenses, including the TAMRON 150-500mm lens in time-lapse mode on my Z8 with 1-minute intervals and a 10-second exposure time.
Capturing shots every minute leading up to totality, I became immersed in the experience during totality and momentarily forgot to shoot the initial minute, only realizing when my time-lapse activated. Despite heavy clouds moving in during totality, obscuring the eclipse and preventing shots of the diamonds or the latter part of the series, I managed to snap a few frames before and after totality, thanks to bracketing. Although I missed some parts of the eclipse, I am overall pleased with the two images and the moon series I was able to create.
© Kurt Gardner
Click image to view larger
Tips for focusing and zooming:
1. Focusing on the sun initially can be challenging. I opted for manual focus and quickly adjusted to fine-tune focus on the moon as it crossed in front of the sun, especially using the TAMRON 150-500mm lens. I characterize the lens as quick and perfect for staying on track while I track the fast movements of the sun and moon.
2. I also suggest not to zoom in too much in order to capture the fascinating glows that might occur in the clouds or during the eclipse.
-------------------------------
Cecil Holmes
“The tip I can offer is to research, research, and research more and be flexible, also. These eclipse shots involve a ton of planning, especially if you have to travel to the area of totality. I was checking weather apps constantly on my phone and was willing to move according to where the best weather was. Ultimately our group decided on a location in Ada, OH. Based on the weather forecasts, this spot was as good as any within reasonable driving distance. It worked out well, too. The place we photographed was a private lot that brought in food trucks and had activities for the kids. It ended up being more like an eclipse tailgate!
From a technical standpoint, I had never photographed an eclipse before so I had to go based on settings others had suggested that had.”
© Cecil Holmes
Tamron 150-500mm (474mm), f/8, 1/1600 sec.
Click image to view larger
Starting point for camera settings:
1. For those who have never photographing an eclipse before, use these suggested settings as a starting point.
2. For example, I found a lot of suggestions that recommended shooting the Bailey's Beads at F/8, ISO 100, and 1/4500th of a second. We had a few clouds around the eclipse and I noticed at that suggested shutter speed things were looking a bit dark, so I had to adjust to let in more light. I think I ended up going with 1/1600th second for the images I liked.
3. So, use the suggested settings as a starting point and keep an eye on your exposure. You may need to adjust for conditions.
Join us in chasing these celestial events across the globe, and let TAMRON lenses be your companion in capturing the magic of the cosmos!
Is your Tamron News subscription up to date? Click to subscribe to all editions of Tamron News featuring how-to tips, new product news, contest announcements and inspiration!
More Photo Tips | Watch Videos | Learn More About Tamron Lenses | Photo Gallery